
How Do I Fix Nail Pops in Drywall and Hide the Repair?
If you’re wondering how do I fix nail pops in drywall, the most reliable solution is to secure the drywall panel to the framing with a new fastener before repairing the visible damage. Drive a drywall screw approximately 1½ inches from the popped nail into the same stud, reset or remove the original nail, fill both indentations with joint compound, sand the surface smooth, apply primer and repaint.
Simply covering a protruding nail with joint compound usually provides only a temporary cosmetic repair. If the drywall is still moving or the original fastener is loose, the compound can crack or push outward again.
Drywall nail pops are common in both newer and older homes. They can result from shrinking framing lumber, loose drywall attachment, improperly installed fasteners or uneven framing. Understanding which problem you’re dealing with helps you choose a repair that lasts rather than repeatedly patching the same spot.
This blog explains how to identify the cause, repair nail pops correctly, select the right materials and recognize situations that require more extensive drywall work.
TL;DR
- Secure the drywall first: Install a new drywall screw into the same framing member, approximately 1½ inches from the popped fastener.
- Reset the original nail: Carefully drive it slightly below the drywall surface or remove it if it is loose.
- Repair the indentation: Remove loose material and apply joint compound in thin coats.
- Finish the surface: Allow the compound to dry, sand it smooth, apply drywall primer and repaint.
- Address the underlying cause: Shrinking lumber, loose panels and framing irregularities can cause nail pops to return if the repair only covers the visible bump.
What Are Drywall Nail Pops?
A drywall nail pop is a small raised bump or circular crack that appears when a nail or screw head pushes through the finished surface of a drywall panel.
The fastener originally holds the drywall against a wood or metal framing member. Over time, movement between the panel, fastener and framing can cause the fastener head to become visible. A typical nail pop looks like:
- A slightly raised, rounded imperfection visible on a painted wall or ceiling.
- A circular crack surrounding a nail or screw head.
- A small piece of joint compound that has broken away.
- A visible metal fastener beneath the damaged surface.
Although the name refers to nails, screw pops are also common. Both problems involve the drywall fastener moving relative to the finished panel surface.
A single nail pop is usually a small repair that requires minimal work. However, multiple pops appearing in the same area may indicate a broader problem with framing movement or drywall attachment.
Why Do Nail Pops Happen in Drywall?
Before repairing a nail pop, identify what caused it. Different underlying problems require slightly different approaches.
The Gypsum Association identifies several common causes, including lumber shrinkage, loose drywall attachment, improperly aligned or warped framing, incorrect fastener length and improper fastening.
1. Shrinking Framing Lumber
Wood framing naturally expands and contracts as its moisture content changes. When a house is constructed, framing lumber may contain more moisture than it will after the building has been occupied. As the lumber dries, it can shrink.
This movement can affect drywall fasteners. Imagine a nail driven through drywall into a relatively damp wood stud. As the stud dries, the wood can shrink around the nail shaft. The nail head may gradually become exposed above the drywall surface.
This is one reason nail pops frequently appear in newer homes during the first heating season. In the Chicago North Shore area, seasonal indoor heating can contribute to changes in the moisture content of framing lumber. Winter heating reduces indoor relative humidity in many homes, which can accelerate the drying of wood that was installed with higher moisture content.
What to do: If nail pops appear during the first heating season, consider whether framing lumber is still drying. The Gypsum Association recommends waiting until the end of the heating season to repair pops that appear one or more months into the heating season, since additional shrinkage may cause repaired areas to reopen.
2. Loose Drywall Attachment
Sometimes the framing is not the main problem. The drywall panel may simply not be secured tightly enough. This can happen when:
- A nail was not driven correctly into the framing.
- A drywall fastener missed the stud.
- A fastener was installed at an incorrect angle.
- The drywall was not held firmly against the framing during installation.
- An existing fastener has loosened over time.
When the panel moves slightly, the surrounding joint compound can separate from the fastener head. Eventually, a visible bump or crack develops.
What to do: Reattach the panel with a new drywall screw driven into the same framing member. Resetting the original nail without securing the panel may not correct the movement.
3. Warped, Twisted or Uneven Framing
Framing problems can also contribute to nail pops. A stud that is bowed, twisted or improperly aligned may prevent drywall from sitting flat against the framing surface. If a drywall panel bridges across an uneven stud, pressure can develop around the attachment points. Changes in framing position or pressure can eventually cause the fastener heads to become visible.
This situation is different from an ordinary loose nail because the drywall may not sit flat even after the fastener is replaced.
What to do: Check whether the drywall moves or whether the surrounding surface appears uneven. If several fasteners are popping along the same stud or the panel cannot sit firmly against the framing, additional investigation may be necessary. Simply adding more screws will not correct a severely bowed or twisted framing member.
4. Incorrect Fastener Installation
Fastener selection and installation also matter. A nail or screw that is too long may penetrate farther into the framing than necessary. Excessive penetration can increase the effects of lumber shrinkage. Improper installation can create additional problems:
- Underdriven fasteners may leave the drywall insufficiently secured.
- Overdriven screws can break the drywall face paper.
- Fasteners installed at an angle may not hold the panel properly.
- Incorrect fastener types may not provide suitable holding power.
The correct fastener depends on drywall thickness, framing material and the installation system.
Tools and Materials Needed to Fix Nail Pops
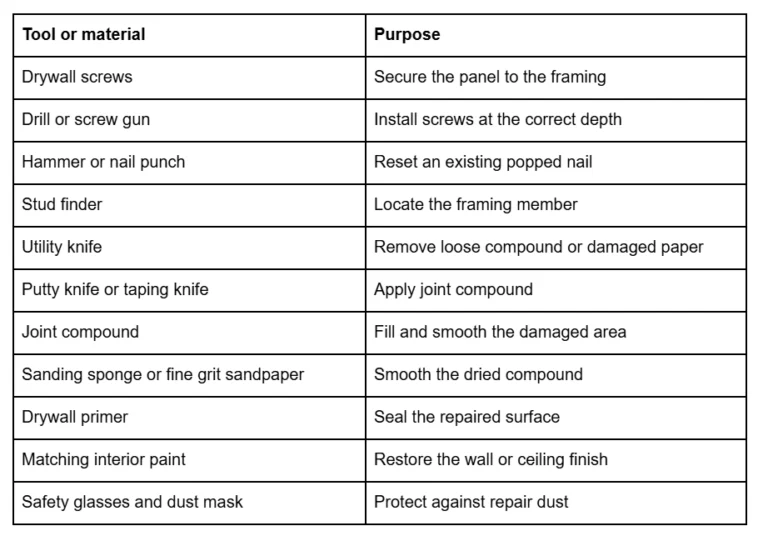
For most small nail pops, you do not need specialized drywall equipment. A basic repair kit is usually sufficient.
However, having the correct screw and knowing where the framing is located are particularly important. A screw that misses the stud will not provide the support needed to keep the panel stable.
How Do I Fix Nail Pops in Drywall? Step by Step
Once you understand why the fastener has popped, you can begin repairing the damaged area. The most important part is securing the drywall before applying joint compound. Follow these steps to restore the surface.
1. Inspect the Nail Pop and Surrounding Drywall
Start by examining the raised area. Look for:
- A nail or screw head protruding through the surface.
- Cracked or loose joint compound.
- Torn drywall paper around the fastener.
- Soft or crumbling gypsum underneath the paint.
- Movement when you gently press the drywall near the damaged area.
Press gently around the nail pop to determine whether the panel moves against the framing. If the drywall feels secure, the problem may be limited to the original fastener. If it moves inward or outward, the panel needs additional support before you repair the surface.
Also check whether several nail pops appear in a straight line. This can indicate that multiple fasteners along the same framing member have loosened.
If you suspect a pipe, electrical cable or other obstruction behind the wall, take care when selecting the location and depth of new screws. Do not drill blindly into an area where concealed utilities may be present.
2. Locate the Framing Member
Find the stud behind the popped nail using a stud finder. This step is essential because the replacement screw must enter the framing to hold the drywall securely. A screw installed only into the gypsum board will not provide the necessary support.
Mark the stud’s position above and below the damaged area if needed. This helps you maintain alignment when installing the replacement fastener.
For a ceiling repair, the same principle applies, but use extra care because gravity places additional stress on an inadequately supported panel.
3. Install a New Drywall Screw
Drive a new drywall screw into the same stud, approximately 1½ inches from the popped nail. This is the critical step that prevents the drywall from moving around the original fastener. Follow these guidelines:
- Position the screw approximately 1½ inches above or below the popped nail, while keeping it in the same framing member.
- Apply gentle pressure to the drywall near the screw location so the panel sits firmly against the framing.
- Drive the screw straight into the stud.
- Stop when the screw head sits slightly below the drywall surface.
- Check that the surrounding drywall remains firm.
The screw should create a small indentation without tearing through the drywall’s paper facing.
Do not overdrive the screw. The paper facing contributes to the drywall’s holding strength. If the screw breaks through that paper, it can lose much of its ability to hold the panel securely.
The Gypsum Association’s repair guidance specifically recommends installing a new fastener approximately 1½ inches from the popped fastener while bringing the back of the drywall into firm contact with the framing.
4. Reset or Remove the Original Nail
After securing drywall with the new screw, address original popped nail. You have two options.
Option A: Reset the nail
If the nail is still reasonably secure, use a hammer and nail punch to drive it slightly below the drywall surface.
The goal is to create a shallow depression that can be filled with joint compound. Avoid striking the surrounding drywall too hard. Excessive force can crack the gypsum core or damage the paper facing.
Option B: Remove the nail
If the nail is loose, badly bent or no longer holding properly, remove it carefully. A nail that repeatedly moves can cause the finished compound to crack again. Removing a faulty fastener eliminates that source of movement.
If removal leaves a small hole, fill it with joint compound after the drywall has been secured. The important distinction is that the new screw provides the holding power. The original nail should no longer be responsible for keeping the panel attached.
5. Remove Loose Material and Prepare the Surface
Before applying joint compound, inspect the damaged area. Use a utility knife or putty knife to remove loose paint, broken compound and pieces of drywall paper that are no longer attached.
Do not cut away sound drywall unnecessarily. If the paper facing has been torn, remove loose edges carefully. Exposed gypsum or damaged paper may require additional preparation before finishing.
For a small, clean indentation where the drywall paper remains intact, joint compound can generally be applied directly.
If the surrounding paper is damaged or the gypsum core has broken, a more involved repair may be necessary. Reinforcing the damaged area with suitable drywall tape can help prevent the repair from cracking.
6. Apply Joint Compound
Once the fasteners are secure and the surface is clean, apply joint compound over the indentations. You can use premixed all purpose joint compound or another product suitable for small drywall repairs. Follow these instructions:
- Apply a small amount of joint compound to a putty knife.
- Press the compound into the indentation over the original nail.
- Cover the new screw head as well.
- Remove excess compound with the knife.
- Feather the edges so repair blends into the surrounding wall.
- Allow the compound to dry according to the manufacturer’s instructions.
Apply thin coats rather than trying to fill everything with one thick application. A thick layer may shrink as it dries, leaving a shallow depression that requires another coat.
For deeper indentations or damaged drywall paper, additional coats may be needed. Allow each coat to dry before applying the next.
Why does this matter?
Joint compound is a finishing material, not a structural adhesive. It fills surface imperfections and creates a smooth appearance, but it cannot reliably hold a loose drywall panel against a stud.
If you skip the fastening step, the panel may continue moving underneath the compound. That movement can cause another visible bump or crack.
7. Sand the Repaired Area
After the joint compound has dried completely, sand the area until it is smooth and level with the surrounding drywall. Use a fine grit sanding sponge or drywall sandpaper. A few practical tips:
Use light pressure to avoid damaging the surrounding paper. Sand the edges of the repair gradually. Avoid creating a hollow area by sanding too aggressively. Check the surface from different angles to identify remaining ridges. Use a work light positioned at an angle to reveal imperfections.
If the first coat has left a visible depression, apply another thin coat, allow it to dry and sand again. The objective is not simply to make the repair smooth to the touch. It should also blend into the surrounding wall without a noticeable raised edge.
Wear a dust mask and protect nearby furniture and flooring during sanding. Drywall compound dust can spread beyond the immediate repair area.
8. Apply Drywall Primer
Once sanding is complete, remove the dust with a clean, dry cloth or suitable vacuum attachment. Apply a drywall primer or primer specifically recommended for the repaired surface.
Joint compound is more porous than the surrounding painted wall. If you apply paint directly over the repair, the patched area may absorb paint differently and create a dull or uneven looking spot.
This difference in surface absorption is commonly called flashing. Primer helps create a more uniform surface for the finish coat. Follow the primer manufacturer’s instructions for application, drying time, and compatibility with the finish paint.
9. Repaint the Repaired Area
After the primer has dried, apply matching interior paint. Use the same paint color, sheen and preferably the same product used on the existing wall.
However, even an accurate color match may not make a small touch up invisible. Existing paint can change appearance over time because of sunlight, cleaning, normal wear and aging. A spot repair may be noticeable if:
- The original paint has faded.
- The wall has a satin or semi gloss finish.
- The repaired area has a different texture.
- The paint was applied with a different roller or technique.
If the touch up creates a visible difference, repainting the entire wall from corner to corner may produce a more consistent appearance. For textured walls, you may also need to reproduce the existing texture before priming and painting.
Planning a Painting Project?
Why Simply Covering a Nail Pop With Joint Compound Does Not Work
One of the most common mistakes in drywall repair is applying joint compound directly over a protruding nail without first securing the panel. It might look smooth immediately after painting, but the original problem remains underneath. Consider what happens when a nail is loose inside a stud:
- The drywall panel moves slightly when pressure is applied.
- The nail head moves relative to the drywall surface.
- The compound covering the nail experiences repeated stress.
- The compound eventually separates or cracks.
- The raised bump becomes visible again.
Adding more compound does not stop this movement. The repair needs to address two separate problems:
- Mechanical stability: The drywall must be properly attached to the framing.
- Surface appearance: The damaged indentation must be filled, sanded, primed and painted.
This distinction is especially important for ceilings and areas with multiple fastener pops. A cosmetic patch may conceal the symptom, but proper fastening addresses the reason it appeared.
Common Mistakes to Avoid When Repairing Drywall Nail Pops
Even a small repair can produce poor results when the preparation or fastening is incorrect. Here are several mistakes worth avoiding.
1. Driving the Original Nail Back In Without Adding Support
Hammering a popped nail back into place may temporarily flatten the surface. However, if the original nail has loosened or the drywall is moving, the nail can pop out again. Install a replacement fastener in the same framing member before finishing the surface.
2. Driving the New Screw Too Deep
An overdriven screw can break the drywall paper and weaken the surrounding gypsum. The screw should sit just below the surface without breaking the paper facing. If the screw has stripped or torn through the drywall, install a replacement in an undamaged location along the framing.
3. Applying Too Much Joint Compound
Thick compound can shrink unevenly, making the repaired area difficult to level. Use multiple thin coats when necessary. Allow each coat to dry fully before proceeding.
4. Skipping Primer
Painting directly over joint compound can produce a visibly different finish. Always prime the repaired area before applying the finish paint.
5. Sanding Before the Compound Dries
Partially dried compound can tear, smear or pull away during sanding. Check the manufacturer’s drying instructions rather than assuming the surface is ready based on its appearance.
6. Ignoring Multiple Nail Pops
Several nail pops in one area may indicate a loose drywall panel, framing movement or another installation issue. Repairing each visible bump individually without investigating the pattern can result in repeated repairs.
Planning a Painting Project?
How to Fix Multiple Nail Pops in Drywall
When several nail pops appear across the same wall or ceiling, inspect the entire affected area before repairing individual fasteners. The pattern can provide useful clues about the underlying problem.
Multiple Pops Along One Stud
A vertical line of nail pops may indicate that the drywall is not securely attached to a particular framing member.
Check whether the panel moves when you press around the affected areas. If it does, additional drywall screws may be necessary to secure the panel along that stud.
Nail Pops Across Several Areas
If nail pops appear throughout a room, consider whether the building is experiencing normal framing shrinkage or whether there is a broader installation problem. This is particularly relevant in newer homes where framing lumber may still be drying.
Nail Pops on Ceilings
Ceiling nail pops deserve additional attention because gravity continuously pulls the drywall away from its supporting structure.
If several fasteners are protruding, the ceiling feels loose or the panel appears to sag, do not rely on cosmetic repairs.
The drywall may require additional fastening or more extensive correction. If a ceiling panel is noticeably sagging or separating, have it inspected before attempting repairs.
When Should You Hire a Drywall Professional?
Most isolated nail pops are manageable DIY repairs. However, some situations require more than filling a small indentation. Consider professional assistance when:
- Multiple nail pops continue returning after previous repairs.
- Large sections of drywall move when pressed.
- The ceiling drywall is sagging or separating from the framing.
- The framing appears severely bowed, twisted or damaged.
- The drywall paper and gypsum core are extensively damaged.
- Nail pops appear alongside water stains, soft drywall or signs of moisture intrusion.
- You cannot confidently locate the framing or identify potential concealed utilities.
Water damage deserves particular attention. A nail pop accompanied by staining or soft drywall should not automatically be treated as an ordinary fastener problem. Find and address the source of moisture before repairing the surface.
A professional can inspect the affected area, determine whether the issue involves fastener failure or framing movement and establish the correct repair approach.
For homeowners in Glenview, Wilmette, Northbrook, Evanston and surrounding Chicago North Shore communities, Big League Painting provides drywall repair and related interior painting services when damaged surfaces need professional attention.
How to Prevent Drywall Nail Pops From Returning
Although not every nail pop can be prevented, proper drywall installation and suitable environmental conditions can reduce the likelihood of recurring problems. Consider these preventive measures:
Use properly dried framing lumber. Lumber with excessive moisture content can shrink after drywall installation. Keeping framing materials dry and allowing appropriate acclimation helps reduce movement.
Use the correct fasteners. Select drywall screws or nails appropriate for the panel thickness and framing material. Follow the drywall manufacturer’s installation requirements. Secure drywall properly. Panels should sit firmly against the framing during fastening. Loose attachment can allow movement that eventually produces visible fastener pops.
Avoid damaging the drywall paper. Overdriven screws weaken the panel’s holding surface. Proper screw depth is essential. Maintain reasonable indoor humidity. Large changes in indoor humidity can contribute to seasonal movement in wood framing. Consistent indoor conditions can help limit unnecessary fluctuations, although they cannot eliminate normal lumber shrinkage.
Address moisture problems promptly. Leaks and repeated wetting can contribute to movement and deterioration in building materials. Investigate moisture problems rather than covering their visible effects.
The Gypsum Association and Drywall Finishing Council provide additional guidance on fastener installation, framing conditions and correcting drywall attachment problems.
Conclusion
Fixing drywall nail pops properly involves more than concealing a small bump with joint compound. The drywall must first be secured to the framing, the original fastener must be reset or removed and the damaged surface must be finished with compound, sanding, primer and paint.
Understanding whether the problem comes from shrinking lumber, loose fasteners or uneven framing helps prevent repeated repairs.
If the damage involves multiple fasteners, recurring movement or a larger drywall problem, Big League Painting can help homeowners address the drywall damage and restore the surrounding interior finish.