
How to Skim Coat a Ceiling and Hide Cracks & Imperfections
TL;DR
| Best for | Ceilings with visible drywall seams, patch repairs, light texture or minor surface damage before repainting. |
| Difficulty | Moderate. The technique is straightforward, but working overhead and keeping the surface flat takes practice. |
| Time Required | Usually 2–4 days for an average room, including drying, sanding and priming. Actual drying time depends on humidity, temperature and the joint compound used. |
| How Many Coats? | Most ceilings need two thin skim coats. Heavily textured or uneven ceilings may require a third. |
| Key Takeaway | Thin coats, proper drying and careful sanding produce a smoother ceiling than trying to fix everything in one heavy application. |
If you’re wondering how to skim coat a ceiling, the process involves applying one or more thin coats of joint compound over the entire ceiling to create a smooth, even surface before priming and painting. It’s one of the best ways to hide minor imperfections, old texture, drywall seams and patch repairs without replacing the drywall. Success depends on proper surface preparation, using the right mud consistency, applying thin coats and allowing adequate drying time between each application.
If your ceiling has shallow dents, old texture, visible drywall joints or paint damage that shows through every coat of paint, skim coating is often the best way to create a smooth, paint ready surface. The process involves applying one or more very thin coats of joint compound, smoothing each layer with a wide drywall knife or trowel, allowing it to dry completely, sanding away minor imperfections and finishing with a quality drywall primer before painting. When done correctly, skim coating can make an older ceiling look nearly new without replacing the drywall.
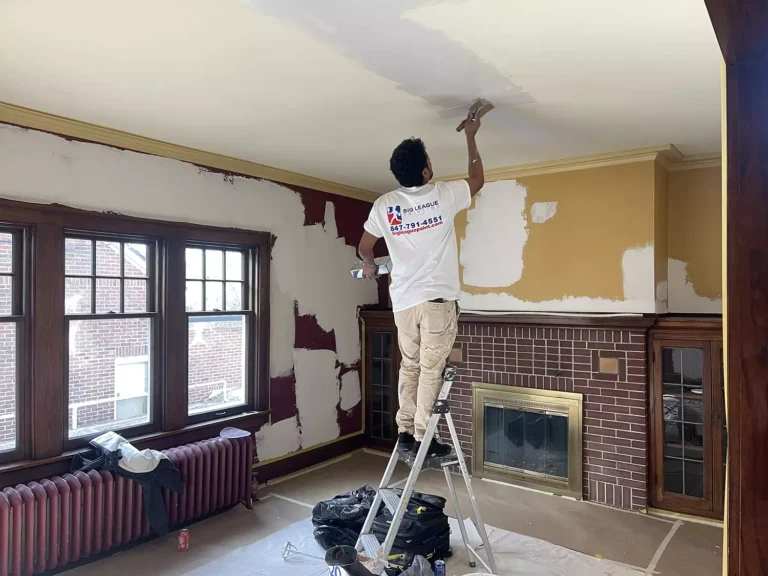
Why Homeowners Skim Coat Ceilings
Ceilings often reveal imperfections that walls hide. Light fixtures, recessed lighting and sunlight entering through windows create low angle lighting that exaggerates every bump, ridge and drywall seam.
Professional painters typically recommend skim coating when cosmetic defects are widespread but the drywall itself remains structurally sound. Common reasons include:
- Removing the appearance of old repairs.
- Smoothing orange peel or heavy paint texture.
- Preparing after popcorn ceiling removal.
- Covering numerous patch repairs.
- Creating a Level 5-style finish before painting.
- Improving paint appearance under bright lighting.
Replacing drywall is usually unnecessary unless the panels have extensive water damage, mold or structural deterioration.
Signs Your Ceiling Needs Skim Coating
Not every ceiling requires skim coating. Professional painters first determine whether the defects are isolated or spread across the entire surface. Skim coating usually makes sense when you notice:
- Multiple visible drywall joints.
- Numerous shallow dents or gouges.
- Roller stipple from years of repainting.
- Uneven texture after popcorn removal.
- Previous patch repairs that remain visible.
- Hairline surface cracking (not structural movement).
- Flashing where patches absorb paint differently.
A Professional Inspection Tip
One of the easiest ways to judge a ceiling is by using a bright LED work light held at a low angle across the surface.
Professional painters rarely inspect ceilings using only normal room lighting because overhead lights hide many imperfections. Raking light exposes high spots, knife marks, sanding scratches and ridges that will become obvious after painting. If defects are clearly visible under angled lighting, skim coating will usually improve the finished appearance.
When Skim Coating Is NOT the Right Solution
Skim coating fixes cosmetic surface problems, not structural issues. Avoid skim coating if the ceiling has:
1. Active water leaks
Repair the leak completely before any drywall work. Moisture trapped behind new joint compound can cause staining, peeling paint, soft drywall or mold growth.
2. Loose drywall
If drywall panels move when pressed, the fasteners or framing need repair first.
3. Mold contamination
Joint compound should never be applied over active mold growth. The source of moisture must be corrected and contaminated materials addressed appropriately.
4. Severe sagging
Water damaged drywall that has lost structural strength usually requires replacement instead of resurfacing.
5. Peeling paint that hasn’t been stabilized
Loose paint should be scraped, sanded and properly sealed before skim coating.
Tools and Materials
Using the right tools often makes a bigger difference than buying expensive materials.
Essential Tools
- 10-inch drywall knife.
- 12- to 14-inch taping knife.
- 14- to 24-inch finishing knife or skimming blade.
- Mud pan.
- Mixing paddle.
- Drill.
- Pole sander.
- Sanding sponge.
- LED inspection light.
- Extension pole.
- Step ladder or scaffold.
Materials
- All purpose or lightweight joint compound.
- Water for thinning.
- Drywall primer.
- Painter’s tape.
- Plastic sheeting.
- Fine grit sanding paper (typically 180–220 grit).
- Dust mask or respirator.
- Safety glasses.
Which Joint Compound Works Best?
Most professionals use pre mixed joint compound for skim coating because it offers longer working time and smoother consistency.
Lightweight compounds are easier to sand, making them popular for homeowners. Setting type compounds “hot mud” harden chemically rather than by drying. They are excellent for repairs but are generally less forgiving for beginners attempting full ceiling skim coats because they set quickly.
Planning a Painting Project?
Step by Step Skim Coating Process
Step 1: Prepare the Room
Cover floors completely. Remove or protect light fixtures. Seal doorways with plastic to reduce dust migration. Dust from ceiling sanding spreads farther than most homeowners expect.
Step 2: Clean the Ceiling
Dust, grease and smoke residue interfere with adhesion. Vacuum loose debris first. If necessary, wash greasy ceilings with an appropriate cleaner and allow them to dry fully.
Step 3: Repair Damage
Before skim coating, repair:
- Nail pops.
- Cracks.
- Loose tape.
- Deep dents.
- Damaged drywall corners.
Skim coating is intended to level shallow imperfections, not fill large voids.
Step 4: Prime if Needed
A common question is whether you can skim coat over painted ceilings. Yes, in most cases you can. However, glossy paint should be lightly sanded to improve adhesion. Stained surfaces or repaired areas may also benefit from a bonding or stain blocking primer before applying joint compound. Skipping this step on slick paint can contribute to poor adhesion or bubbling.
Step 5: Mix the Joint Compound
Professionals rarely use joint compound straight from the bucket. A small amount of clean water is often mixed in to create a smoother, creamier consistency. The mud should spread easily without dripping off the knife.
If it is too thick:
- It leaves ridges.
- It tires your arms faster.
- It becomes difficult to feather.
If it is too thin:
- It sags.
- It shrinks excessively.
- It requires additional coats.
Step 6: Apply the First Coat
Load the knife evenly. Work in manageable sections. Spread the compound using firm, even pressure. Keep the layer very thin. Many beginners mistakenly try to make the ceiling perfectly smooth during the first coat. Professionals don’t. The goal is simply to cover the surface evenly while leaving as few ridges as possible.
Step 7: Feather the Edges
Feathering means reducing pressure along the outer edge of each pass so the compound blends smoothly into the surrounding surface. This minimizes sanding later. Heavy edges create unnecessary ridges that are difficult to remove.
Step 8: Allow Complete Drying
Drying times vary depending on: Humidity. Temperature. Air circulation. Product formulation. Thickness of application. Never apply another coat over damp compound. Moisture trapped between coats can lead to shrinkage, cracking, or poor bonding.
Step 9: Apply Additional Coats
Most ceilings require two skim coats. Heavily textured or uneven ceilings may need three. Each coat should become progressively thinner. The final coat is intended to refine the surface, not build thickness.
Planning a Painting Project?
Professional Techniques for Smoother Results
Experienced drywall finishers rely on technique more than force.
1. Change Directions Between Coats
Many professionals apply the second coat perpendicular to the first. Cross hatching helps eliminate low spots and produces a flatter surface.
2. Keep the Knife Clean
Dry compound stuck to the blade leaves scratches and lines. Wipe the knife frequently.
3. Watch the Ceiling From Multiple Angles
Inspect after each coat using portable lighting. Imperfections often disappear when viewed straight on but become obvious from another direction.
4. Maintain a Wet Edge
Stopping in the middle of a large section allows the compound to begin drying before the next pass. Maintaining a wet edge helps prevent lap marks.
5. Don’t Chase Every Imperfection
Overworking partially drying compound often creates more defects than it fixes. If something isn’t perfect, allow it to dry and correct it during the next coat.
Common Mistakes and How to Avoid Them
1. Applying Mud Too Thick
Thick coats shrink more during drying and increase sanding. Thin applications produce flatter results.
2. Skipping Surface Preparation
Dust, peeling paint or grease reduce adhesion. Good preparation often determines whether skim coating lasts for years.
3. Sanding Too Aggressively
Heavy sanding exposes drywall paper and creates uneven spots. The goal is to remove ridges, not erase the skim coat.
4. Poor Lighting
Many ceilings appear smooth until fresh paint is applied. Professional inspection lighting catches flaws before primer goes on.
5. Rushing Dry Time
Fans improve air circulation, but excessive heat can dry the surface faster than the material underneath, increasing the chance of cracking. Moderate airflow and stable temperatures produce better results.
6. Ignoring Moisture Problems
If stains continue appearing after repairs, moisture may still be entering from above. No skim coat can permanently hide an active leak.
Drying, Sanding and Priming
Once the final coat has dried completely, inspect the ceiling carefully under angled lighting. Sand lightly using a pole sander and fine grit abrasive. Professional finishers usually sand only enough to remove:
- Knife lines.
- Minor ridges.
- Small bumps.
- Overlap marks.
Excessive sanding creates unnecessary dust and can expose drywall paper.
After sanding:
- Vacuum thoroughly.
- Wipe remaining dust if needed.
- Apply a high quality drywall primer.
- Inspect again before painting.
Many homeowners ask if primer is really necessary. Yes. Fresh joint compound absorbs paint much differently than painted drywall. Primer seals the surface, promotes even paint adhesion, and helps produce a uniform finish color and sheen.
Planning a Painting Project?
DIY vs. Hiring a Professional
Skim coating is possible for motivated homeowners, but ceilings present unique challenges because all work is done overhead.
DIY
- Lower material cost.
- Good for one room.
- Requires patience.
- Physically demanding.
- Learning curve.
Professional
- Faster completion.
- Better consistency.
- Professional lighting and tools.
- Less cleanup
- Often produces a smoother Level 5-style finish.
Large vaulted ceilings, extensive repairs or homes with critical lighting conditions are often worth hiring out because even small imperfections become highly visible after painting.
Big League Painting recommends evaluating the ceiling under bright side lighting before deciding whether the finish quality meets your expectations.
Cost Considerations
Material costs for skim coating are generally modest compared with labor. Typical expenses include:
- Joint compound.
- Primer.
- Sandpaper.
- Plastic protection.
- Drywall knives if you don’t already own them.
Labor is the largest expense because skim coating is time intensive. Much of that time is spent preparing the room, applying multiple thin coats, waiting for proper drying, sanding, inspecting under good lighting and cleaning fine drywall dust.
Ceilings with extensive repairs, high ceilings or heavy texture removal typically require more labor than smooth ceilings with only minor imperfections.
Maintenance After Painting
A properly skim coated ceiling requires very little maintenance. To keep it looking its best:
- Address roof or plumbing leaks promptly.
- Control indoor humidity in bathrooms and kitchens with adequate ventilation.
- Avoid excessive scrubbing of flat ceiling paint, which can burnish the finish.
- Repair small dents or cracks before they become larger, more noticeable defects.
- Repaint only after the surface is clean and sound to maintain consistent sheen.
Periodic inspection around vents, plumbing fixtures and upper floor bathrooms can help catch moisture problems before they damage the finished surface.
Conclusion
Learning how to skim coat a ceiling takes practice, but the fundamentals remain the same regardless of room size: prepare the surface thoroughly, use the correct joint compound consistency, apply several thin coats instead of one thick coat, allow each layer to dry fully, inspect under angled lighting and always prime before painting. Those steps are what separate a ceiling that looks smooth from one where every ridge and repair becomes visible after the paint dries.
For homeowners tackling a single room, skim coating is a realistic DIY project if time, patience and careful technique are priorities. When ceilings have extensive damage, challenging lighting or demand a near flawless finish, hiring an experienced drywall finisher or painting contractor can save considerable time and deliver more consistent results.