
How to Limewash Walls: A Step by Step Guide for a Timeless, Natural Finish
Limewash is a mineral based coating made primarily from hydrated lime, water and natural pigments. It creates a soft, matte finish that develops character as it cures and ages. Homeowners who want a natural look with subtle texture often choose limewash for brick, plaster, masonry and specially prepared interior walls. Learning how to limewash walls is worthwhile if you appreciate an aged, handcrafted appearance. However, it isn’t the right choice for every surface. Walls with glossy paint, moisture problems or flexible finishes usually need additional preparation or another type of coating.
TL;DR
- Limewash is made from hydrated lime, water and optional mineral pigments.
- It performs best on porous surfaces like brick, stone, plaster and masonry.
- Drywall usually requires a mineral primer before application.
- Thin, multiple coats produce better results than one heavy coat.
- Limewash cures through carbonation, which takes several weeks.
- The finish naturally develops color variation and an aging patina.
- It is breathable and very low in VOCs.
- Regular touch ups are simple because new coats blend naturally.
What Is Limewash?
Limewash is one of the oldest decorative wall finishes still used today. Long before modern latex paints existed, builders protected masonry with a mixture of hydrated lime and water. As the coating cures, calcium hydroxide reacts with carbon dioxide in the air through a process called carbonation, gradually turning back into limestone.
Unlike conventional paint, limewash doesn’t create a plastic film on the surface. Instead, it bonds into porous materials, producing a soft, chalky appearance with natural movement and depth.
That unique look explains why limewash has become popular in modern homes, historic renovations, farmhouse interiors, Mediterranean style designs and European inspired architecture.
Why Homeowners Choose Limewash
Limewash offers qualities that traditional paint cannot easily replicate.
1. Natural Character
Every brushstroke creates subtle variations in tone. Instead of looking perfectly uniform, the finish gains depth that changes throughout the day as lighting shifts.
2. Breathable Finish
Because limewash remains breathable, moisture vapor can move through porous walls rather than becoming trapped underneath the coating. This makes it especially suitable for masonry and older buildings.
3. Very Low VOC Content
Most traditional limewash products contain few or no volatile organic compounds (VOCs), making them an attractive choice for people looking for natural wall finishes.
4. Ages Gracefully
Rather than peeling dramatically, limewash slowly develops a worn appearance that many homeowners intentionally seek.
5. Easy Spot Repairs
Touching up conventional paint often leaves visible patches. Fresh limewash blends much more naturally because color variation is already part of the finish.
Where Limewash Works Best
Choosing the right surface is one of the biggest factors in a successful project. Limewash performs exceptionally well on:
- Brick.
- Stone.
- Concrete.
- Stucco.
- Masonry.
- Traditional lime plaster.
- Cement plaster.
- Properly primed drywall.
Porous materials allow the lime to bond effectively, creating long lasting adhesion. Interior accent walls, fireplaces, entryways, dining rooms and exterior masonry are among the most popular applications.
Where Limewash Doesn’t Work Well
Limewash isn’t a universal coating. Avoid applying it directly over:
- Gloss paint.
- Oil based paint.
- Vinyl wallpaper.
- Ceramic tile.
- Metal.
- Plastic.
- Previously sealed masonry.
- Water damaged surfaces.
These materials prevent proper absorption and can lead to poor adhesion or uneven wear. Moisture issues should always be corrected before any decorative finish is applied.
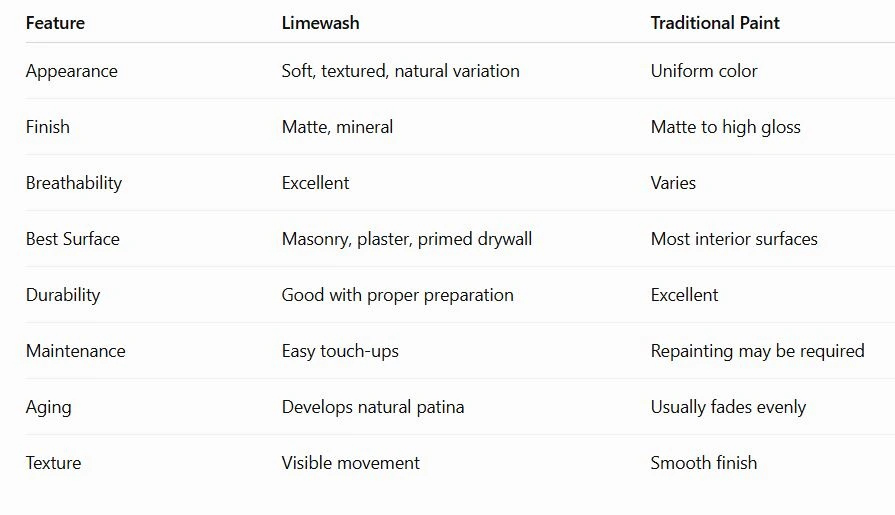
Limewash vs Traditional Paint
Planning a Painting Project?
Limewash vs Whitewash, Roman Clay and Clay Paint
These finishes are often confused because they share a natural appearance.
Limewash
- Mineral coating.
- Breathable.
- Ages naturally.
- Works best on porous surfaces.
Whitewash
Whitewash is traditionally a thinner lime mixture that creates a lighter, more translucent appearance, especially on wood and brick.
Roman Clay
Roman clay produces a smooth, layered finish with hand troweled texture. It is decorative rather than mineral reactive.
Clay Paint
Clay paint contains natural clay instead of lime. It creates a velvety finish but doesn’t cure through carbonation.
Materials You’ll Need
Gather everything before starting.
Essential Supplies
- Limewash paint.
- Mineral primer (for drywall).
- Paint roller.
- Large natural brush.
- Paint tray.
- Stir stick.
- Spray bottle with clean water.
- Painter’s tape.
- Drop cloths.
- Ladder.
- Protective gloves.
- Safety glasses.
- Dust mask during preparation.
Natural masonry brushes typically produce the most authentic finish because they leave subtle movement in the coating.
Surface Preparation
Professional painters often say preparation determines whether limewash succeeds or fails.
Clean the Surface
Remove:
- Dust.
- Dirt.
- Cobwebs.
- Grease.
- Loose paint.
- Efflorescence on masonry.
The cleaner the wall, the better the lime bonds.
Repair Damage
Fill cracks and patch damaged areas before coating. Allow repairs to dry completely.
Prime Drywall
Fresh drywall cannot usually receive limewash directly. Apply a mineral compatible primer that creates the appropriate surface for adhesion. Professional painters with Big League Painting often recommend checking the limewash manufacturer’s primer requirements because different products have different specifications.
Dampen Porous Surfaces
Brick and plaster absorb moisture rapidly. Lightly mist the wall before application to slow absorption and improve workability. The wall should feel damp rather than dripping wet.
Planning a Painting Project?
How to Limewash Walls Step by Step
Step 1: Stir Thoroughly
Mineral pigments settle quickly. Mix until the consistency becomes completely uniform. Continue stirring periodically during application.
Step 2: Start in Small Sections
Work in areas approximately three to four feet wide. Keeping a wet edge helps reduce visible lap marks.
Step 3: Apply Thin Coats
Use light pressure. Crosshatch brush strokes create the classic limewash appearance. Avoid trying to achieve full coverage immediately. Thin coats cure more consistently than heavy ones.
Step 4: Blend Brush Strokes
Before the coating begins drying, lightly feather the edges into adjacent sections. This creates natural movement without harsh transitions.
Step 5: Allow Proper Drying
Most limewash becomes dry to the touch within several hours. Always follow the manufacturer’s recommended drying schedule before adding another coat. Humidity and temperature can significantly affect drying time.
Step 6: Apply Additional Coats
Most projects require: Two coats. Occasionally three coats. Each additional coat adds depth rather than dramatically changing the color.
Drying vs Curing
Many homeowners confuse drying with curing. Drying simply means moisture has evaporated. Curing is much longer. Limewash slowly hardens through carbonation, reacting with carbon dioxide in the surrounding air.
Complete curing often continues for several weeks. During this period, the finish gradually develops its final appearance. Color variation during curing is completely normal.
Common Limewash Mistakes
Even experienced DIY painters occasionally encounter problems.
1. Applying Heavy Coats
Thick applications can dry unevenly. Several thin coats almost always produce better results.
2. Skipping Surface Preparation
Dirt, loose paint and glossy finishes interfere with adhesion. Preparation should never be rushed.
3. Painting in Direct Sunlight
High temperatures cause moisture to evaporate too quickly. This may lead to inconsistent color. Morning or late afternoon usually provides better conditions.
4. Ignoring Moisture Problems
Limewash is breathable, but it isn’t a solution for water intrusion. Leaks should always be repaired first.
5. Expecting Uniform Color
Natural variation is part of limewash’s appeal. Trying to eliminate every shade difference often removes the handcrafted look people want.
Professional Tips for Better Results
Experienced painters rely on several techniques that improve consistency.
- Stir frequently throughout the project.
- Keep brush strokes random instead of perfectly straight.
- Work from top to bottom.
- Finish one wall before stopping.
- Maintain a wet edge whenever possible.
- Test the finish on a small section first.
- View the wall under different lighting before applying another coat.
One additional tip surprises many homeowners. The wall often looks lighter once fully cured than it did during application. Waiting until curing progresses helps prevent unnecessary extra coats.
Planning a Painting Project?
How Long Does Limewash Last?
Longevity depends largely on the surface and environment. Interior limewash commonly lasts many years with minimal maintenance. Exterior applications experience more weather exposure and may require refreshing sooner.
Unlike traditional paint, refreshing limewash usually involves cleaning the surface and applying another thin coat rather than completely stripping the old finish.
Cleaning and Maintaining Limewashed Walls
Maintenance is generally straightforward. For routine cleaning:
- Dust with a microfiber cloth.
- Use a dry brush for textured areas.
- Avoid harsh chemical cleaners.
- Wipe gently with a damp cloth only when necessary.
Aggressive scrubbing can gradually wear the mineral finish. Minor scuffs often become less noticeable because of the natural variation already present.
Can You Limewash Drywall?
Yes, but preparation matters. Fresh drywall is not naturally porous enough for direct limewash application. Most manufacturers recommend using a compatible mineral primer first.
The primer creates a surface that allows proper adhesion while maintaining the appearance homeowners expect. Skipping this step often leads to disappointing results.
Can You Limewash Previously Painted Walls?
Sometimes. The answer depends on the existing finish. Flat, porous coatings may accept limewash after proper preparation.
Glossy latex or oil based paints usually require sanding, specialty primers or complete removal before limewash can perform properly. Always test a small section before committing to the entire room.
When DIY May Not Be the Best Choice
Many homeowners successfully complete smaller limewash projects. Certain situations benefit from professional experience. Consider hiring a painter when:
- Walls exceed two stories.
- Historic masonry requires preservation.
- Moisture problems exist.
- Extensive drywall repairs are needed.
- Decorative consistency is critical across large rooms. Exterior scaffolding becomes necessary.
Large open spaces require maintaining a continuous wet edge, which becomes much more challenging for one person.
Big League Painting has helped homeowners evaluate whether a limewash project is suitable for DIY or would benefit from professional application, especially on larger homes and historic properties.
Conclusion
Limewash offers a timeless finish that combines natural beauty with centuries old performance. Success depends far more on choosing the right surface, preparing it carefully and applying several thin coats than on specialized equipment. Homeowners who understand how the material cures, where it performs best and what limitations it has are much more likely to achieve lasting results. Whether you’re refreshing an interior accent wall or updating exterior masonry, taking the time to prepare properly will produce a finish that develops character for years rather than months.