
Best Primer for Painting Kitchen Cabinets: Avoid Peeling, Chipping and Stains
Painting kitchen cabinets can give your kitchen a fresh new look, but the finish is only as good as the surface underneath. The best primer for painting kitchen cabinets depends on your cabinet material, existing finish and the type of paint you plan to use. A quality primer improves paint adhesion, blocks stains, seals porous surfaces and helps your topcoat last longer without peeling or chipping. In this blog, you’ll learn why primer matters, how to choose the right type and which products professionals trust for different cabinet materials.
Key Facts
| Best Overall Primer | Zinsser BIN Shellac-Based Primer |
| Best Bonding Primer | INSL-X STIX Waterborne Bonding Primer |
| Best Stain Blocking Primer | Zinsser Cover Stain Oil Based Primer |
| Best for Oak Cabinets | Zinsser BIN Shellac Based Primer |
| Best for Laminate Cabinets | INSL-X STIX Waterborne Bonding Primer |
| Oil vs. Water Based | Oil and shellac primers offer superior stain blocking. Water based bonding primers have lower odor and easier cleanup. |
| Typical Dry Time | 30 minutes to 2 hours depending on the primer |
| Is Sanding Required? | Yes. Even high adhesion primers perform better on properly prepared surfaces. |
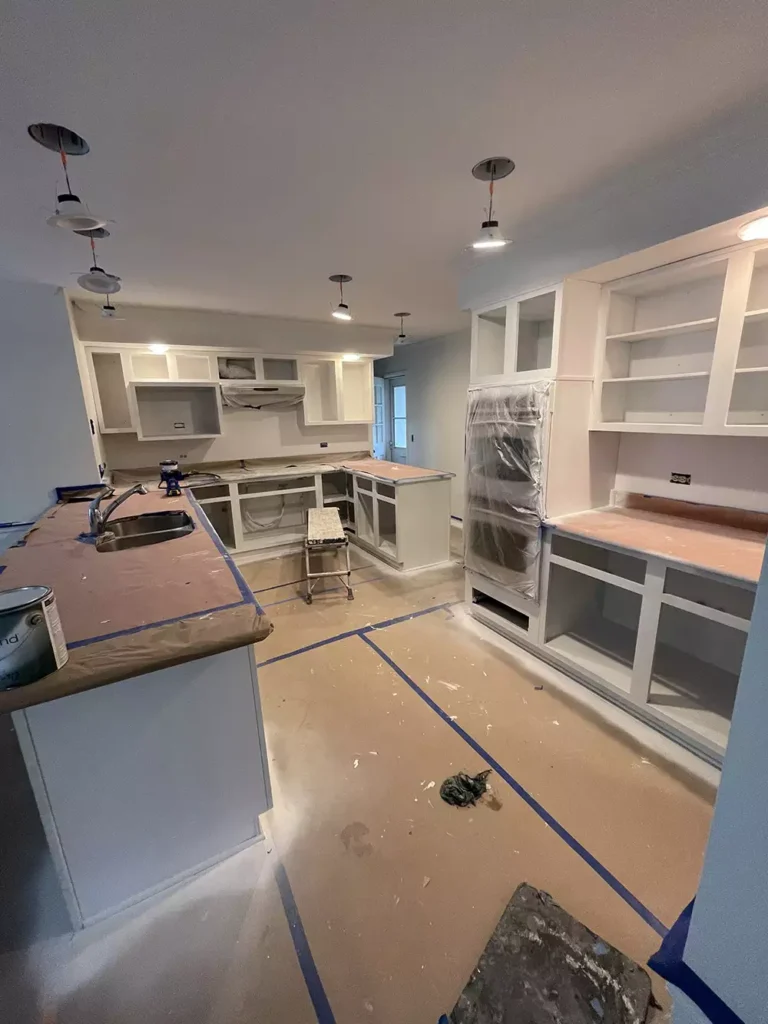
Why Primer Matters for Kitchen Cabinets
Kitchen cabinets see more daily use than almost any other painted surface in a home. They are opened and closed countless times each day and are regularly exposed to grease, moisture, food splatter, steam and cleaning products.
Unlike drywall, cabinet doors usually have a smooth factory finish that paint cannot grip well on its own. Applying paint directly over that surface often leads to peeling around handles, chipped edges and uneven coverage.
Primer creates a stable surface that allows the paint to bond securely. It also seals stains, prevents wood tannins from bleeding through and provides a consistent base color so the finish coat looks even.
Professional cabinet painters rarely skip primer because fixing failed cabinet paint takes much longer than doing the preparation correctly the first time.
What Happens Without Primer
Skipping primer often leads to problems that become noticeable within months rather than years. Common issues include:
- Paint peeling around cabinet pulls and knobs.
- Chipping on frequently used doors and drawers.
- Uneven paint sheen.
- Visible wood grain or dark stains bleeding through.
- Poor adhesion on laminate cabinets.
- Yellowing caused by wood tannins.
- Additional finish coats needed for proper coverage.
- Reduced durability in high moisture kitchens.
Many homeowners assume expensive cabinet paint eliminates the need for primer. Even premium products from Sherwin Williams and Benjamin Moore perform better when applied over a properly selected primer.
How to Choose Best Primer for Painting Kitchen Cabinets
There isn’t one primer that works perfectly for every cabinet. The right choice depends on what you’re painting.
Ask yourself these questions before buying primer:
- Are the cabinets solid wood, MDF, laminate or thermofoil?
- Are they stained or already painted?
- Is there grease buildup from years of cooking?
- Are you changing from a dark stain to white paint?
- Will you be using water based cabinet paint?
Answering these questions helps narrow down the best primer for your project.
A professional usually considers four factors:
Adhesion. Stain blocking. Drying time. Compatibility with the finish paint.
Below are the three primer categories most commonly used for cabinet refinishing.
1. Oil Based Primer
Oil based primer has been a dependable choice for decades because it seals wood well and blocks many stains. Although water based products have improved significantly, oil primer still has advantages in certain situations.
Pros
- Excellent adhesion to wood.
- Good stain blocking performance.
- Helps reduce tannin bleed.
- Sands smoothly after curing.
- Works under most cabinet paints.
Cons
- Strong odor.
- Longer drying time.
- Requires mineral spirits for cleanup.
- Higher VOC content than most water based primers.
Best Uses
Oil based primer works well for:
- Previously stained wood cabinets.
- Cabinets with minor discoloration.
- Moderate tannin prone woods.
- Older kitchen cabinets with worn finishes.
- Projects where maximum durability is desired.
One widely used example is Zinsser Cover Stain, which balances stain blocking with good adhesion on many cabinet surfaces.
2. Shellac Primer
Many cabinet painters consider shellac primer the gold standard for difficult cabinet projects. Its biggest advantage is exceptional stain blocking and extremely fast drying. It also bonds aggressively to glossy surfaces after proper preparation. The trade off is its strong odor and alcohol based cleanup.
Pros
- Outstanding stain blocking.
- Excellent adhesion.
- Dries in about 30 to 45 minutes.
- Blocks smoke damage, water stains and wood tannins.
- Ideal for dramatic color changes.
Cons
- Strong fumes during application.
- Alcohol required for cleanup.
- Higher cost than many primers.
- Requires good ventilation.
Best Uses
Shellac primer is ideal for:
Oak cabinets. Maple cabinets with stubborn stains. Heavy tannin bleed. Water damage. Smoke damage. Cabinets being painted white. Dark stained cabinets.
A favorite among professionals is Zinsser BIN, especially when painting oak cabinets white. It helps reduce grain staining and minimizes bleed through that can appear weeks after painting.
Planning a Painting Project?
3. Water Based Bonding Primer
Modern water based bonding primers have improved significantly over the last decade. They provide strong adhesion with much lower odor and faster cleanup than oil based products. Many homeowners also prefer them because brushes and rollers clean with soap and water. Although they may not block severe stains as effectively as shellac, they perform exceptionally well on clean, properly prepared surfaces.
Pros
- Low odor.
- Easy soap and water cleanup.
- Excellent adhesion to difficult surfaces.
- Flexible finish.
- Lower VOC levels.
- Compatible with most modern cabinet paints.
Cons
- Less effective against severe stains.
- May require additional coats over dark wood.
- Surface preparation becomes even more important.
Best Uses
Water based bonding primer is an excellent choice for:
- Laminate cabinets.
- MDF cabinets.
- Previously painted cabinets.
- Factory finished cabinets.
- Kitchens where odor is a concern.
- DIY cabinet painting projects.
INSL-X STIX is one of the most respected bonding primers in this category because it adheres exceptionally well to slick surfaces that ordinary latex primers struggle to cover.
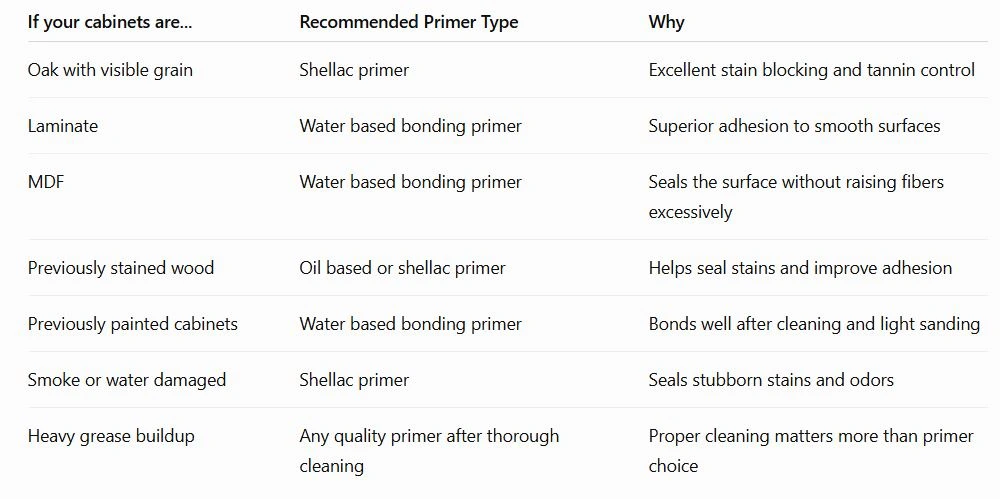
Quick Decision Guide
Use this simple guide to narrow your choice before buying primer.
One More Thing Professionals Never Skip
Choosing the right primer is only part of the process. Even the best products cannot bond to grease, wax or silicone residue left behind by years of cooking and cleaning.
Before priming, professionals thoroughly wash cabinets using a heavy duty cleaner such as TSP Cleaner or a suitable TSP substitute. On glossy factory finishes, a Deglosser can help remove surface sheen before sanding. Most cabinet surfaces are then lightly scuffed with 220-grit sandpaper, creating a fine scratch pattern that gives the primer a stronger mechanical bond.
Skipping these preparation steps is one of the main reasons DIY cabinet painting projects fail, regardless of which primer is used. Proper cabinet preparation allows the primer to perform as intended and gives the finish coat the best chance of lasting for years.
Planning a Painting Project?
Best Primers for Painting Kitchen Cabinets
No single primer is the right choice for every cabinet. The best product depends on the cabinet material, the existing finish and the condition of the surface. Professionals often keep more than one primer on hand because different situations call for different strengths.
Zinsser BIN Shellac Based Primer
For many professional painters, Zinsser BIN is the benchmark for cabinet priming. It bonds aggressively to wood, previously painted surfaces and many glossy finishes after proper preparation. More importantly, it seals tannins that often bleed through lighter paint colors, especially on oak.
It’s commonly used when:
- Painting dark cabinets white.
- Covering smoke or water stains.
- Refinishing oak cabinets.
- Blocking knots and wood discoloration.
The strong odor means good ventilation is important, but the fast drying time allows projects to move quickly.
INSL-X STIX Waterborne Bonding Primer
When painting laminate cabinets or factory finished surfaces, adhesion becomes the biggest concern. INSL-X STIX was developed specifically for difficult surfaces where ordinary latex primers often fail. It provides:
- Excellent grip on slick finishes.
- Flexible coating that resists peeling.
- Soap and water cleanup.
- Lower odor than oil or shellac products.
For homeowners working indoors, it’s often the easiest primer to use while still producing professional results.
Zinsser Cover Stain
Cover Stain has remained popular because it combines strong adhesion with dependable stain blocking. It works especially well on:
- Previously stained cabinets.
- Wood with moderate tannin bleed.
- Cabinet doors that have worn through their factory finish.
Many painters choose it when shellac isn’t necessary but a standard water based primer may not provide enough sealing.
Kilz Original
Kilz Original has been used for decades as a stain blocking primer. Although it isn’t designed specifically for cabinet refinishing, it performs well on cabinets with:
- Water stains.
- Smoke residue.
- Minor discoloration.
- Previously repaired areas.
Proper surface preparation is still necessary for the best adhesion.
Rust Oleum Zinsser Bulls Eye 1-2-3
For cabinets that are already painted and in good condition, Bulls Eye 1-2-3 can be a practical option. Its advantages include:
- Easy application.
- Low odor.
- Quick cleanup.
- Good adhesion after sanding.
However, it isn’t the best choice for heavy stain blocking or oak cabinets with significant tannin bleed.
Planning a Painting Project?
Step by Step Priming Process
Even the best primer cannot compensate for poor preparation. Professional cabinet painters spend much more time preparing surfaces than applying paint because preparation determines how long the finish will last.
1. Remove Doors and Hardware
Take off:
- Cabinet doors.
- Drawer fronts.
- Hinges.
- Knobs.
- Pulls.
Label each door and its hardware so everything goes back in the correct location.
2. Clean Every Surface Thoroughly
Kitchen cabinets collect years of invisible grease. Even cabinets that appear clean often have cooking oils that interfere with paint adhesion. Wash every surface using:
- TSP Cleaner.
- A TSP substitute.
- A degreasing cabinet cleaner.
Rinse thoroughly and allow the cabinets to dry completely.
3. Degloss the Existing Finish
Most cabinets have a smooth protective coating. Lightly sanding helps, but many professionals also use a Deglosser to soften the factory finish before sanding. Deglosser is especially useful around:
- Decorative profiles.
- Inside corners.
- Detailed trim.
- Routed cabinet doors.
Always follow the manufacturer’s instructions.
4. Sand the Cabinets
Sanding creates microscopic scratches that improve paint adhesion. For most cabinets:
- Start with 150 to 180-grit if the finish is very glossy.
- Finish with 220-grit sandpaper for a smooth surface.
The goal isn’t to remove all the old finish. You’re creating a surface the primer can grip.
After sanding:
- Vacuum dust.
- Wipe with a microfiber cloth.
- Use a tack cloth if needed.
Dust left behind can create bumps in the primer.
5. Make Repairs
Before priming, inspect every cabinet carefully.
Repair:
- Nail holes.
- Small dents.
- Deep scratches.
- Minor cracks.
- Chipped corners.
Allow fillers to dry completely before sanding them smooth. Skipping repairs often leaves imperfections that become more noticeable after painting.
6. Apply the Primer
Apply a thin, even coat. Avoid flooding the surface. A quality brush works well for corners and profiles, while a microfiber roller or paint sprayer produces a smoother finish on flat areas.
Pay attention to:
- Inside edges.
- Door profiles.
- End panels.
- Cabinet frames.
Uneven primer can show through the finish coat.
7. Allow Proper Drying Time
Dry to the touch doesn’t always mean ready to sand or paint. Temperature and humidity affect drying time. Always follow the primer manufacturer’s recommendations before applying another coat or sanding. Rushing this step is a common cause of adhesion problems.
8. Apply a Second Coat if Needed
Some situations benefit from another coat of primer. Examples include:
- Dark stain changing to white paint.
- Oak with visible grain.
- Water stains.
- Repairs that absorbed the first coat.
- Uneven color after priming.
Two thin coats generally perform better than one heavy coat.
9. Inspect Before Painting
Before opening the finish paint, inspect every surface under bright lighting.
Look for:
- Missed spots.
- Dust nibs.
- Drips.
- Brush marks.
- Raised grain.
- Remaining stains.
Lightly sand any rough areas before applying cabinet paint. Taking ten extra minutes here can noticeably improve the final appearance.
Planning a Painting Project?
Common Mistakes That Cause Cabinet Paint to Fail
Many cabinet painting failures aren’t caused by the paint itself. They happen because the surface wasn’t properly prepared before painting.
1. Skipping the Cleaning Step
Grease prevents primer from bonding. Even fingerprints can affect adhesion around cabinet handles. Cleaning should always happen before sanding.
2. Choosing a Cheap Primer
Primer is the foundation of the finish. Saving a few dollars on primer often leads to peeling, additional labor and repainting sooner than expected. Quality primers provide better adhesion, sealing and durability.
3. Priming Over Grease
Primer isn’t designed to seal cooking oils. If grease remains, the primer bonds to the grease instead of the cabinet. Eventually, the entire coating can separate from the surface.
4. Skipping Sanding
Some products advertise that sanding isn’t necessary. In practice, light sanding significantly improves mechanical adhesion on most cabinet surfaces. Professionals rarely rely on primer alone.
5. Applying Primer Too Thick
Heavy coats don’t produce a stronger finish. Instead, they can:
- Sag.
- Drip.
- Dry unevenly.
- Extend drying time.
- Hide detail in decorative profiles.
Thin, consistent coats produce smoother cabinets.
6. Painting Before the Primer Fully Dries
Cabinet projects often fail because homeowners rush. Primer may feel dry after an hour but still be curing underneath. Applying paint too soon can trap solvents and reduce adhesion. Always wait for the recommended drying and recoat times.
Professional Tips for Better Cabinet Painting Results
Experienced cabinet painters rely on consistent preparation rather than shortcuts. These habits make a noticeable difference in the finished product.
- Work in a dust controlled space. Dust settling on wet primer creates bumps that are difficult to remove later.
- Prime both sides of doors on separate drying racks. This reduces handling and helps prevent fingerprints.
- Stir primer thoroughly. Ingredients can settle during storage, affecting consistency and performance.
- Maintain a steady room temperature. Most primers cure best between 60°F and 80°F. Cold temperatures slow drying, while excessive heat can cause the primer to dry too quickly on the surface.
- Use high quality brushes and rollers. Better tools leave fewer brush marks and lint behind.
- Don’t judge coverage while the primer is wet. Some primers level out as they dry and stain blocking products may not look perfectly uniform until cured.
- Lightly sand between coats if recommended. A quick pass with 220-grit sandpaper removes dust nibs and creates an even smoother base for cabinet paint.
- Match the primer to the cabinet material. Laminate, oak, MDF and previously painted cabinets all have different needs. Choosing the right primer is more important than buying the most expensive one.
How long should primer dry before painting?
The answer depends on the product, room temperature and humidity. As a general guideline:
- Shellac primer: about 30 to 45 minutes
- Oil based primer: around 1 to 2 hours
- Water based bonding primer: approximately 2 to 4 hours
Always follow the manufacturer’s instructions for drying and recoating times rather than relying on the surface feeling dry to the touch.
Can primer hide the grain on oak cabinets?
Not completely. Primer helps reduce the appearance of grain, but oak has an open-grain structure that often remains visible after painting. If you want a smooth, furniture like finish, you’ll usually need a grain filler before priming. Many professional cabinet refinishing projects include this additional step when homeowners want the grain to be less noticeable.
Planning a Painting Project?
When to Hire a Professional
Painting kitchen cabinets is one of the more demanding painting projects in a home. Success depends far more on preparation than on applying the finish coat.
A DIY approach is realistic if:
- The cabinets are in good condition.
- You have time to remove doors and hardware.
- You’re comfortable cleaning, sanding and priming carefully.
- You can provide a clean, dust controlled workspace.
- You’re willing to let each coat dry fully before moving to the next step.
Hiring a professional may be worth considering if:
- The cabinets have extensive grease buildup.
- The existing finish is peeling or failing.
- You’re painting oak cabinets and want a smooth finish with minimal visible grain.
- The kitchen is large and downtime needs to be minimized.
- You want a sprayed factory like finish rather than brush or roller marks.
- There is water damage, smoke staining or multiple previous paint layers.
Experienced cabinet painters also have access to commercial spray equipment, drying systems and proven preparation methods that can produce a more consistent finish. If you’re unsure which primer or preparation process is right for your cabinets, Big League Painting can evaluate the cabinet material and recommend the most appropriate refinishing approach.
Conclusion
Choosing the best primer for painting kitchen cabinets is one of the most important decisions you’ll make before opening a can of paint. A quality primer creates a strong bond between the cabinet surface and the finish coat, improves durability, blocks stains and helps produce a smoother, more even appearance.
The right product depends on the cabinet material and condition:
Zinsser BIN is an excellent choice for oak cabinets, heavy stains and major color changes. INSL-X STIX stands out for laminate, MDF and factory finished cabinets where maximum adhesion is needed. Zinsser Cover Stain offers dependable performance on many stained wood cabinets. Kilz Original remains a solid option for sealing stains before painting. Bulls Eye 1-2-3 works well on cabinets that are already painted and in good condition.
No matter which primer you choose, don’t overlook the basics. Thorough cleaning, careful cabinet preparation, proper sanding, thin primer coats and allowing adequate drying time will have a greater impact on the final result than any single product.
If you’re planning a cabinet refinishing project and want lasting results, taking the time to prepare the surface correctly is the best investment you can make. For homeowners who prefer professional guidance or a factory quality finish, Big League Painting can help ensure the job is completed with the right products, proven techniques and attention to detail.