
Can You Wallpaper Over Wallpaper or Should You Remove It?
Can you wallpaper over wallpaper? Yes, you can wallpaper over wallpaper in certain situations, but it is not recommended for every wall. The existing wallpaper must be smooth, firmly attached, clean, dry and free of peeling seams, bubbles and significant texture. Thin, non vinyl wallpaper offers the best chance of success, while damaged, textured or vinyl coated wallpaper should generally be removed first.
Applying a new layer without checking the existing surface can lead to bubbling, poor adhesion, visible seams and peeling. The condition and type of the old wallpaper matter just as much as the new material you plan to install.
TL;DR
You can install new wallpaper over existing wallpaper when the original layer is thin, smooth, securely bonded and compatible with the new wallpaper adhesive. Keep these points in mind:
- Best conditions: One layer of smooth, non coated wallpaper with no loose edges or surface damage.
- Avoid vinyl wallpaper: Its moisture resistant surface can prevent ordinary wallpaper adhesive from bonding properly.
- Check the texture: Raised patterns, embossed designs and noticeable seams may show through the new covering.
- Prepare the surface: Clean it, repair minor imperfections, address loose seams and use compatible primer when the wallpaper manufacturer’s instructions allow it.
- Remove damaged wallpaper: Peeling, bubbling, moisture damaged or heavily textured wallpaper creates an unreliable foundation.
- Consider future removal: Multiple wallpaper layers can make subsequent renovation and removal more difficult.
Removing the old wallpaper is generally the more reliable approach because it allows you to inspect and prepare the wall before installing a new covering.
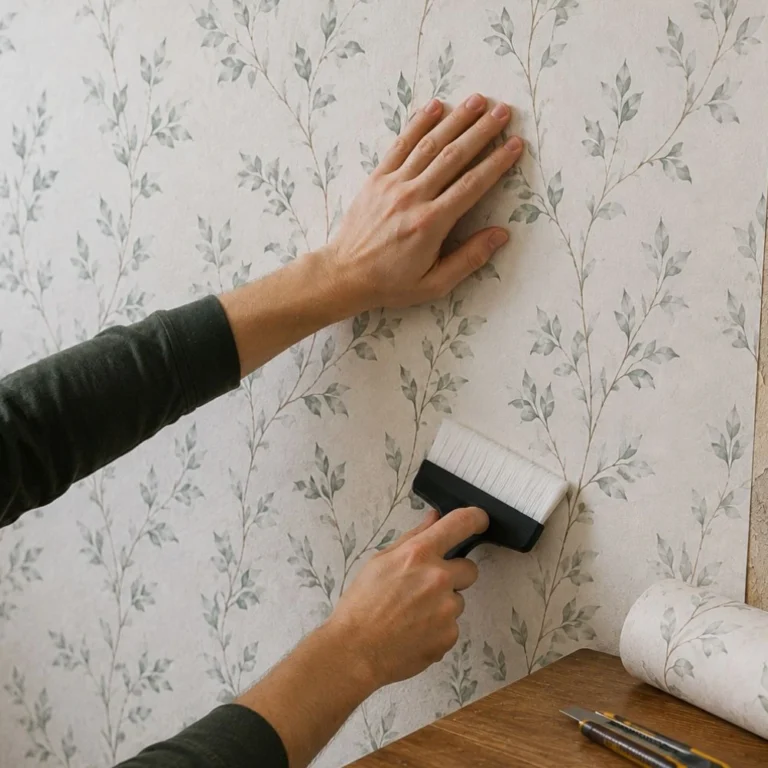
1. When Can You Wallpaper Over Existing Wallpaper?
The decision depends on the condition of the existing wallcovering, its material, the adhesive holding it in place and the type of wallpaper you want to install.
A new wallpaper layer adds moisture, weight and tension to the existing surface. If the original wallpaper cannot withstand those conditions, the new installation may fail even if it initially looks smooth.
Conditions That Make Wallpapering Over Wallpaper Possible
The existing wallpaper should meet all of the following conditions:
- Firm adhesion: Every section should remain securely attached to the wall. There should be no loose corners, lifting edges or bubbling.
- Smooth surface: The existing paper should have minimal texture, raised seams, or embossed patterns.
- Single layer: One layer is generally easier to assess and more stable than multiple layers of old wallpaper.
- Clean surface: There should be no grease, dust, soap residue or other contaminants that could interfere with adhesion.
- Dry condition: The wall should have no signs of water intrusion, persistent dampness or moisture damage.
- Compatible materials: The existing wallpaper and the new wallpaper adhesive must work together.
If even one of these conditions is questionable, removing the old covering is usually the safer decision. York Wallcoverings acknowledges that installing over existing wallpaper is sometimes possible, but recommends checking adhesion, flattening seams, using compatible surface preparation products and testing a strip before proceeding.
When Should You Avoid Applying New Wallpaper Over Old Wallpaper?
Some surfaces create problems that additional wallpaper cannot correct. Avoid covering existing wallpaper when you find:
- Peeling edges or seams that repeatedly lift.
- Bubbles that indicate poor adhesion.
- Water stains or suspected moisture damage.
- Mold or mildew.
- Heavy embossing or raised decorative patterns.
- Several layers of old wallpaper.
- Vinyl coated surfaces that may prevent the new adhesive from bonding.
- Cracked, brittle or deteriorating wallpaper.
There is an important distinction between a cosmetic imperfection and a structural problem with the existing covering. A small surface scratch may be repairable. A wallpaper layer separating from the drywall is a different issue. Covering it does not restore its bond to the wall.
2. How Different Wallpaper Types Affect the Installation
Not all wallpaper behaves the same way. Manufacturers use different backing materials, surface coatings and adhesive systems. These differences determine how well a new layer can bond to an existing one. Before buying replacement wallpaper, identify what is already installed.
Traditional Paper Wallpaper
Traditional paper wallpaper is one of the more favorable surfaces for installing another layer, provided it is thin, smooth and securely bonded.
Paper is generally more absorbent than vinyl. However, this does not automatically make it a suitable surface for every adhesive.
The main concern is moisture. Water from new wallpaper paste can soften the adhesive underneath the original paper. As the new wallpaper expands and later dries, it can place additional stress on the old layer. Check for:
- Loose edges around corners and baseboards.
- Seams that have started separating.
- Thin areas where the paper has torn.
- Discoloration or signs of previous water exposure.
A firmly attached paper wallpaper may be suitable for a carefully tested installation, but removal remains the more dependable preparation method.
Vinyl Wallpaper
Vinyl wallpaper has a surface coating that provides greater resistance to moisture and makes many products easier to clean.
That same characteristic creates an adhesion problem. Standard wallpaper adhesives generally need a suitable surface to establish a reliable bond. A smooth, nonporous vinyl coating may prevent ordinary paste from gripping properly.
Some manufacturers offer specialized vinyl to vinyl adhesives for specific applications. However, that does not mean every new wallpaper can be installed over every vinyl surface. If the existing wallpaper has a vinyl coating, removing it is generally the better choice.
Non Woven Wallpaper
Non woven wallpaper uses a combination of textile fibers and other materials to create a stable backing. Many modern non woven products use a paste the wall installation method, meaning adhesive is applied directly to the wall rather than to the back of each wallpaper strip.
This installation method does not automatically make non woven wallpaper suitable for covering old wallpaper. The adhesive still needs a compatible, stable substrate. If the existing layer softens, absorbs moisture unevenly or separates from the wall, the new wallpaper can develop bubbles and loose seams. Check the product’s installation instructions before choosing this approach.
Peel and Stick Wallpaper
Peel and stick wallpaper uses a pressure sensitive adhesive instead of traditional wet wallpaper paste. Although this eliminates the moisture associated with conventional wallpaper installation, it does not eliminate surface preparation requirements.
The adhesive needs consistent contact with a clean, smooth surface. Old wallpaper seams, texture, dust and weak surface coatings can interfere with adhesion.
There is also a future removal concern. Pulling off peel and stick wallpaper may disturb the older wallpaper underneath, particularly if its adhesive has weakened.
For this reason, installing peel and stick wallpaper over an existing layer is best considered a temporary decorating option only when the manufacturer permits it and the underlying surface is stable.
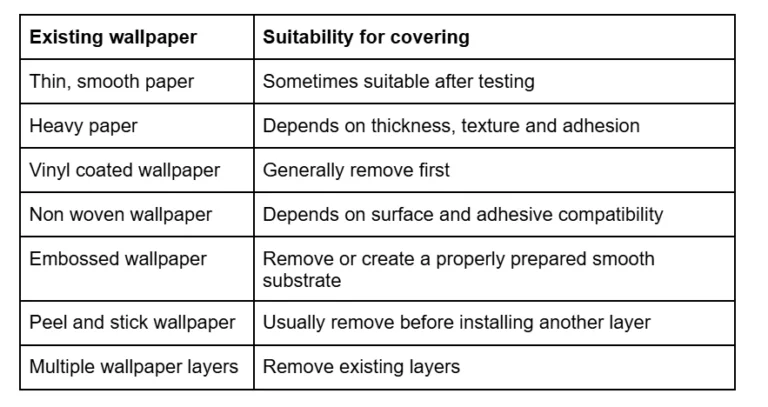
Wallpaper Type Comparison
Planning a Painting Project?
3. How to Inspect Existing Wallpaper Before Installation
A quick inspection can prevent a much larger repair later. Do not judge the wall only by looking at it from across the room. Problems often appear around seams, corners, outlets and areas exposed to temperature or moisture changes. Use the following inspection process.
1. Check the Number of Existing Layers
Look around an electrical outlet cover, baseboard or another inconspicuous edge where the wallpaper can be inspected safely.
Remove an outlet cover only after switching off the appropriate circuit and verifying that the area is safe. Never insert a blade or tool near electrical wiring.
Look for evidence of multiple wallpaper layers. If several layers are already present, removing them is generally preferable. Each additional layer introduces another potential failure point.
2. Inspect Seams and Corners
Run your fingers gently along the wallpaper seams. Check whether:
- The edges feel raised.
- The paper moves when lightly pressed.
- The seams have gaps.
- The corners are separating.
- The wallpaper makes a crackling sound when gently rubbed.
The Wallcovering Installers Association identifies loose areas and poor adhesion as important warning signs when evaluating existing wallcoverings.
3. Look for Moisture Problems
Inspect areas around windows, exterior walls, bathrooms and plumbing fixtures. Look for:
- Yellow or brown stains.
- Soft or swollen drywall.
- Dark discoloration.
- Musty odors.
- Repeated bubbling or peeling.
Do not wallpaper over a moisture problem. Identify and correct the source first, then allow the wall assembly to dry.
If mold is present, determine the extent of the problem and address it appropriately before installing another wallcovering.
4. Evaluate Surface Texture
Move your hand across the entire wall. Pay particular attention to:
- Raised seams.
- Embossed patterns.
- Wrinkles.
- Old adhesive residue.
- Previous patch repairs.
Even small imperfections can become more noticeable after another layer is installed.
5. Check Adhesion and Compatibility
A wall can appear secure while still having an underlying adhesive problem. A small test installation helps reveal whether the old wallpaper remains stable when exposed to moisture from the new adhesive.
Do not rely on a visual inspection alone. The next section explains how to perform this test.
4. How to Prepare Existing Wallpaper for a New Layer
If the existing wallpaper passes inspection, preparation becomes the most important part of the installation. The goal is to create a clean, smooth, stable surface that will support the new covering without disturbing the original layer.
1. Clean the Existing Wallpaper
Remove dust, loose dirt and surface contaminants. Use a cleaning method compatible with the existing wallpaper. A lightly dampened cloth may be sufficient for some washable wallcoverings.
Avoid soaking the surface. Excessive water can soften the original adhesive and weaken the bond between the wallpaper and drywall. Allow the surface to dry completely before continuing.
2. Repair Loose Seams
If a small seam has lifted but the surrounding wallpaper remains firmly attached, a compatible wallpaper seam adhesive may help secure it.
Apply the product according to its instructions and remove excess adhesive without damaging the surface. However, widespread lifting is a reason to remove the old wallpaper rather than repeatedly repairing it.
3. Smooth Raised Edges and Imperfections
Raised seams can create visible ridges beneath the new wallpaper. Minor surface irregularities may require careful smoothing or filling, depending on the existing material and the manufacturer’s recommendations.
Avoid aggressive sanding that could damage a thin wallpaper surface or expose the underlying drywall. If the existing wallpaper has a pronounced texture, filling and preparing the entire surface may become more complicated than removing it.
4. Choose the Correct Wallpaper Primer
Primer is not simply an optional paint preparation product. A wallpaper primer or compatible sealer can help regulate surface absorption, improve working conditions during installation and make future wallpaper removal easier.
York Wallcoverings explains that primer helps prevent adhesive from being absorbed into porous surfaces, while sizing can provide additional slip during positioning. Some modern products combine these functions.
When applying new wallpaper over existing wallpaper, choose a product specifically approved for the existing surface and the new adhesive system. Do not assume that ordinary interior wall primer will perform the same function as wallpaper primer.
5. Test the New Wallpaper and Adhesive
This is one of the most important steps. Before covering the entire wall:
- Prepare a small section using the intended cleaning and priming products.
- Install a test strip using the new wallpaper and its recommended adhesive.
- Follow the manufacturer’s instructions for application and drying.
- Check the strip for bubbles, wrinkles, lifting edges and changes in the old wallpaper.
- Inspect the test area after the recommended evaluation period.
York Wallcoverings recommends allowing a test strip to rest for 36 hours before proceeding with an installation over existing wallpaper. Follow the specific product instructions if they require a different evaluation period.
If the original wallpaper starts bubbling, separating or softening excessively, stop. Remove the existing layer and prepare the wall properly.
Planning a Painting Project?
5. Important Installation Considerations
Even when the existing wallpaper is suitable, the new installation requires careful planning.
Avoid Aligning the New Seams With Old Seams
The position of the wallpaper seams can affect the finished appearance. If the new wallpaper joints line up directly with the old seams, the combined thickness can create noticeable ridges.
Instead, position the new strips so their seams fall away from the original joints. This will not correct an uneven wall, but it can reduce the visibility of underlying seam lines. York Wallcoverings specifically recommends staggering new wallpaper seams rather than placing them directly over the old ones.
Consider Wallpaper Thickness and Texture
Thin wallpaper is more likely to reveal imperfections beneath it. Heavy wallpaper may conceal minor surface variations, but it does not correct loose seams, poor adhesion or moisture damage. Consider the following:
- Lightweight paper requires a particularly smooth foundation.
- Textured wallpaper can disguise minor cosmetic irregularities.
- Smooth, glossy finishes tend to reveal surface imperfections.
- Large repeating patterns require careful alignment and planning.
- Light colored wallpaper may allow darker patterns underneath to show through.
Do not depend on wallpaper thickness to compensate for poor preparation.
Choose the Correct Adhesive
Different wallpaper products require different adhesives. Some products are pre-pasted, while others require separately applied paste. Certain vinyl and specialty wallcoverings require stronger or more specialized adhesive systems.
The adhesive must be compatible with both the new wallpaper and the prepared surface. Using a stronger adhesive does not necessarily solve a bonding problem with the old wallpaper. In some cases, additional moisture or adhesive strength can place more stress on the existing layer. Always follow the wallpaper manufacturer’s recommendations.
Control Indoor Conditions During Installation
Temperature and humidity can affect adhesive performance and wallpaper drying. For homeowners in the Chicago North Shore area, seasonal indoor heating and cooling can change room conditions considerably. During installation:
- Maintain a reasonably stable indoor temperature.
- Avoid directing heating or cooling vents at freshly installed wallpaper.
- Avoid excessive humidity.
- Provide normal room ventilation without creating strong drafts.
- Follow the adhesive manufacturer’s temperature and drying recommendations.
Do not accelerate drying with direct heat. Uneven drying can contribute to poor seam behavior and installation defects.
6. What Problems Can Occur When You Wallpaper Over Wallpaper?
The main risk is that the new wallpaper depends on an older surface that may not be strong enough to support it. Some problems appear immediately. Others develop after the adhesive dries or as indoor conditions change.
Bubbling and Blistering
Bubbles form when sections of wallpaper lose contact with the surface underneath. Possible causes include:
- Moisture softening the original wallpaper adhesive.
- Air trapped during installation.
- Uneven adhesive distribution.
- Poor adhesion between the existing wallpaper and drywall.
A small bubble in the new wallpaper may be repairable, but widespread bubbling often indicates a deeper problem with the underlying layer.
Visible Seams and Raised Edges
Old wallpaper seams can remain visible through the new covering. This is particularly noticeable with thin wallpaper, smooth finishes and lighting that falls across the wall at an angle.
Even if the new wallpaper is installed correctly, raised edges from the original layer can create unwanted lines.
Peeling and Adhesive Failure
Peeling occurs when one of the bonding layers fails. The new wallpaper might separate from the old wallpaper or the original wallpaper might pull away from the drywall.
The second situation is particularly problematic because repairing the visible surface will not restore the underlying bond.
Old Patterns Showing Through
Dark patterns, strong colors and raised designs may remain visible beneath lighter wallpaper. A suitable pigmented wallpaper primer may help reduce color show through when the existing surface is otherwise suitable. However, primer cannot hide significant texture or correct loose wallpaper.
Difficult Future Wallpaper Removal
This is a problem homeowners often overlook. Suppose you install new wallpaper over an existing layer. Several years later, you decide to remove both.
The removal process now involves multiple layers of wallpaper and potentially different adhesives. One layer may release easily while another remains attached to the drywall. Aggressive scraping or excessive moisture can damage the wall surface. In other words, skipping removal today may create additional preparation work during the next renovation.
Planning a Painting Project?
7. When Is Removing Old Wallpaper the Better Option?
Removing the original wallpaper is generally the best choice when the existing surface is damaged, incompatible or difficult to prepare. It gives you access to the actual wall and allows you to correct problems before installing another covering.
Situations That Call for Complete Removal
Consider stripping the old wallpaper when:
- The existing material is vinyl coated.
- More than one layer is present.
- The wallpaper has widespread peeling or bubbling.
- The surface has deep embossing or heavy texture.
- There are water stains or signs of moisture damage.
- The old adhesive has deteriorated.
- The new wallpaper is thin, light colored or has a smooth finish.
- You want a reliable foundation for an expensive or specialty wallcovering.
Some wallpaper manufacturers recommend removing all existing wallpaper before installation because of the risks of poor adhesion, bubbling and visible seams.
How to Remove Old Wallpaper Properly
The removal process depends on the wallpaper material and the adhesive used. A typical process involves:
- Protect the room: Move furniture, cover flooring and protect nearby trim and electrical components.
- Identify the wallpaper type: Determine whether it is peelable, strippable, washable or vinyl coated.
- Remove the surface layer: Some wallpapers have a removable decorative layer that can be peeled away while leaving a paper backing.
- Apply an appropriate removal solution: Use water or a wallpaper removal product according to the manufacturer’s instructions.
- Loosen stubborn areas: A wallpaper scoring tool or steamer may help with resistant materials. Use caution because excessive moisture or heat can damage drywall.
- Remove remaining adhesive: Scrape carefully and clean residual glue from the wall.
- Allow the wall to dry: Do not apply new wallpaper over damp drywall or remaining wet adhesive.
- Repair and prime: Fill damaged areas, sand smooth, remove dust and apply a compatible wallpaper primer.
Sherwin Williams recommends removing old wallpaper, cleaning away remaining adhesive, repairing the surface, allowing it to dry and applying wallpaper primer before installation.
Important consideration for older homes: If the project involves painted surfaces that may contain lead, do not start sanding or disturbing those coatings without appropriate testing and safety precautions. Sherwin Williams specifically highlights this concern for paint applied before 1977.
What If Wallpaper Removal Damages the Drywall?
This can happen, particularly when wallpaper was installed directly over unprimed drywall. The decorative paper may come off while portions of the drywall’s outer paper facing remain attached to it. Pulling aggressively can tear that facing and expose the gypsum core. When this happens, stop scraping and assess the damage. The repair may involve:
- Removing loose drywall facing.
- Sealing exposed paper with a suitable problem surface sealer.
- Applying joint compound to damaged areas.
- Sanding and smoothing the repairs.
- Priming the entire wall with a compatible wallpaper primer.
Do not apply ordinary wallpaper adhesive directly over torn or exposed drywall paper. The moisture can cause the paper facing to swell and create additional surface damage.
A properly repaired wall provides a more dependable foundation than covering damaged drywall with another wallpaper layer.
8. Wallpaper Over Wallpaper vs. Removing the Existing Layer
Which approach makes more sense depends on the condition of the existing wall and the finish you want.
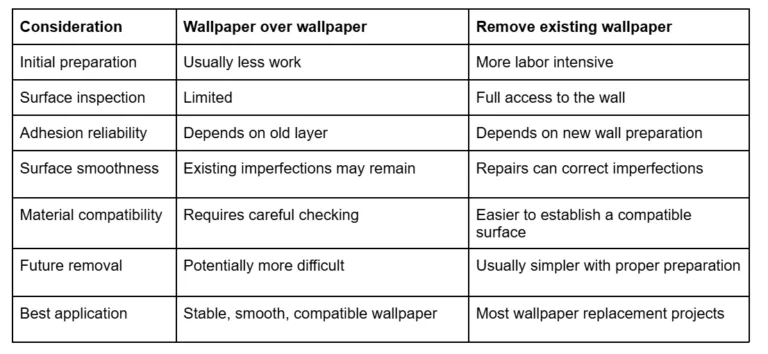
The important distinction is that installing over wallpaper saves removal work only when the original layer is already suitable. If extensive repairs, seam filling and surface preparation are necessary, removing the old material may take less effort overall.
Is Wallpaper Removal Worth the Extra Time?
For homeowners planning to keep their new wallpaper for several years, removing the old layer is usually worth considering. It provides an opportunity to inspect the drywall, remove old adhesive, correct imperfections and apply the correct primer.
For a temporary decorating update over one stable layer, covering the existing wallpaper may be reasonable if the new product manufacturer permits it. The decision should be based on the condition of the wall rather than the desire to avoid a particular preparation step.
9. Should You Wallpaper Over Wallpaper Yourself or Hire a Professional?
A straightforward installation over one stable, smooth paper layer may be manageable for an experienced DIY homeowner. However, several situations make professional assessment worthwhile. Consider professional help when:
- You cannot identify the existing wallpaper material.
- The wall has multiple layers.
- Vinyl or specialty wallcoverings are involved.
- Previous removal attempts have damaged the drywall.
- There are moisture related concerns.
- The new wallpaper is expensive, delicate or difficult to align.
- The wall has extensive surface irregularities.
Professional preparation involves more than simply applying paste and hanging strips. The installer must assess the substrate, determine whether the existing covering can remain, select compatible materials and prepare the wall to support the new finish.
For homeowners planning a larger interior update, Big League Painting can help evaluate painting and wall preparation considerations before a new decorative finish is installed.
The goal is to avoid spending money on new materials before establishing whether the existing wall can support them.
Conclusion
Wallpapering over wallpaper is possible, but it should be treated as an exception rather than the standard installation method.
Wallpapering over existing wallpaper is most likely to work when the wall has one layer of thin, smooth, firmly attached paper wallpaper. Vinyl coatings, heavy textures, loose seams, moisture damage and multiple wallpaper layers are strong reasons to remove the old covering first.
If you decide to install over existing wallpaper, inspect the entire surface, prepare it with compatible products, stagger the seams and test a section before committing to the full wall.
For most wallpaper replacement projects, removing the old material provides a cleaner starting point and makes it easier to identify and correct hidden wall problems.
When planning an interior renovation, Big League Painting encourages homeowners to consider the condition of the underlying walls before choosing their next finish. A successful wallpaper installation starts with a surface that can support it.