
Best Paint for Bathroom Ceiling: What to Use & What to Avoid
The best paint for bathroom ceiling is generally a high quality interior acrylic/latex paint formulated for areas exposed to moisture and humidity, with a finish that balances washability and appearance. For most bathrooms, a low sheen finish such as matte or flat ceiling paint specifically labeled for bathroom or high humidity use can work well, while satin or eggshell may be preferable when the ceiling needs greater washability and moisture resistance. The right choice depends on ventilation, existing surface condition and how much condensation the ceiling regularly receives.
The paint itself, however, is only part of the equation. A bathroom ceiling that is damp, peeling, stained or affected by mold may need cleaning, repair, priming or moisture correction before a new coat goes on. Choosing a suitable coating and applying it to a properly prepared surface will usually matter more than simply picking the most expensive can of paint.
TL;DR
- Best overall choice: Quality interior acrylic/latex paint designed to handle bathroom humidity or other moisture prone areas.
- Best finish: Matte or flat for a traditional ceiling appearance; satin or eggshell when increased washability is more important.
- Primer: Important when the ceiling has stains, repairs, bare drywall or an unsuitable existing coating.
- Avoid: Ordinary low quality interior paint on a ceiling that regularly experiences heavy condensation or moisture.
- Before painting: Fix leaks, persistent moisture, significant mold, damaged drywall and other underlying problems first.
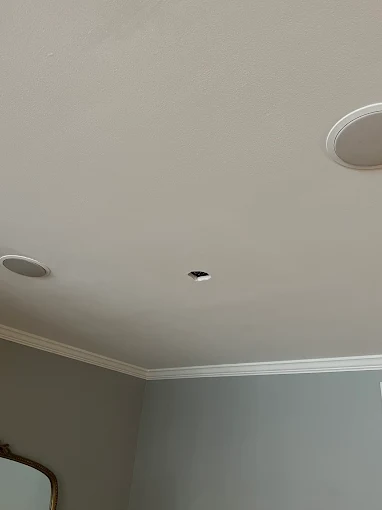
What Makes Bathroom Ceiling Paint Different?
A bathroom ceiling has a tougher environment than the ceiling in a bedroom or hallway. Every hot shower releases water vapor into the room. That warm, humid air rises and can collect near the ceiling. If the bathroom has limited ventilation, moisture may remain on the ceiling and surrounding surfaces for much longer. Over time, repeated exposure to humidity can contribute to:
- Peeling or flaking paint.
- Blistering.
- Discoloration.
- Mildew growth. Water spotting.
- Soft or damaged drywall.
- Premature coating failure.
This does not mean a bathroom requires some completely different category of paint. Instead, the coating should be appropriate for the level of moisture and humidity the room experiences.
A quality acrylic/latex interior coating is generally a practical choice because these paints are commonly used on interior walls and ceilings and are available in formulations intended for moisture prone areas. Always check the manufacturer’s label and technical information rather than assuming every interior latex paint has the same properties.
Ventilation matters more than many homeowners realize
Even excellent bathroom paint can struggle if the room stays excessively humid. A properly functioning exhaust fan should remove humid air rather than simply recirculating it. If condensation routinely remains on the ceiling after showers, look at the ventilation situation before blaming the paint.
A bathroom with good ventilation and normal humidity puts considerably less stress on a ceiling coating than a small, poorly ventilated bathroom where steam accumulates every day.
What Is the Best Paint Finish for a Bathroom Ceiling?
There is no single finish that is automatically right for every bathroom ceiling. For many homeowners, flat or matte remains a good choice because ceilings traditionally benefit from a low sheen appearance. A low sheen coating helps minimize the visual emphasis on minor imperfections, seams, patches and uneven areas.
However, bathrooms can also benefit from a more washable finish.
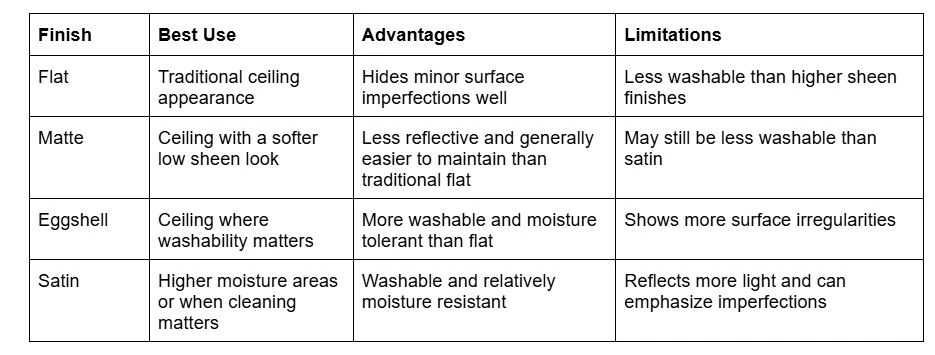
The key is not to assume that more sheen always means better bathroom paint. A glossy ceiling can make surface defects much more noticeable. If your ceiling has visible patches, uneven drywall finishing or other imperfections, a higher sheen may draw attention to them.
For a relatively smooth ceiling with normal bathroom humidity, a quality low sheen coating formulated for the environment is often a sensible choice.
Moisture Resistant vs Mildew Resistant Paint
These terms are related, but they do not mean exactly the same thing.
Moisture resistant paint refers to a coating designed to perform better in areas exposed to humidity or occasional moisture.
Mildew resistant paint typically contains properties intended to help resist mildew growth on the paint film.
That distinction matters because paint cannot solve a moisture problem. If a ceiling repeatedly stays wet because of poor ventilation, a plumbing leak or another source of excessive moisture, simply buying a mildew resistant coating does not eliminate the cause.
Think of the paint as one part of the solution. The room’s moisture conditions are another.
What about mold resistant paint?
Some products are marketed as mold or mildew resistant, but product claims and formulations vary. Read the label carefully and follow the manufacturer’s preparation and application instructions.
If you already have substantial mold growth, don’t assume that covering it with specialized paint is an appropriate fix. The source of moisture needs to be addressed and significant mold problems may require more specialized remediation.
Planning a Painting Project?
Do You Need Primer on a Bathroom Ceiling?
Sometimes you do and sometimes you don’t. If you’re repainting a sound, previously painted ceiling with a compatible coating, thorough cleaning and surface preparation may be enough before applying the new finish.
Primer becomes much more important when the surface has a condition that could interfere with adhesion or appearance.
Primer is particularly useful when
- The drywall is new or exposed.
- You have repaired holes or cracks.
- Patching compound covers portions of the ceiling.
- The surface has significant stains.
- The existing coating is glossy or questionable.
- The ceiling has been sanded back to a different surface.
- You need to seal a porous area.
- Water stains need to be blocked after the moisture source is corrected.
A stain blocking primer can be particularly useful for persistent water stains. However, the stain should not simply be covered without determining why it appeared.
If a water stain came from a plumbing leak that is still active, primer and paint will only hide the evidence temporarily.
Why patched areas can show through
One common problem after ceiling repairs is a patch that remains visible after painting. This can happen because drywall compound and surrounding painted surfaces absorb paint differently. Even when the patch feels smooth, differences in porosity can produce a noticeable area after the finish coat dries.
Priming the repaired area helps provide a more uniform surface for the finish paint.
What Paint Should You Avoid?
The easiest answer is: avoid choosing paint based only on price or color. A very inexpensive general purpose interior coating may not be the right choice for a bathroom ceiling that experiences frequent condensation. You should also be cautious about:
1. Paint not intended for the interior surface
Check the product label to confirm that the coating is appropriate for interior ceilings and the environmental conditions of the bathroom.
2. Exterior paint indoors
Exterior coatings are formulated for outdoor exposure and should not automatically be substituted for interior products simply because they may sound more durable.
3. Very glossy finishes on imperfect ceilings
High sheen does not automatically make a ceiling better suited to a bathroom. It can make dents, seams, roller marks and uneven drywall finishing more visible.
4. Painting over peeling paint
New paint needs a sound surface underneath it. If the existing coating is loose, peeling, bubbling or flaking, painting over it is usually a temporary cosmetic fix. Remove unstable material and correct the underlying problem before applying new paint.
Planning a Painting Project?
How to Prepare a Bathroom Ceiling for Painting
Good preparation often determines whether the finished ceiling looks professional or starts showing problems within a short period.
1. Inspect the ceiling
Look carefully for:
- Peeling paint.
- Cracks.
- Bubbling.
- Brown or yellow water stains.
- Soft drywall.
- Mold or mildew.
- Previous repairs.
- Areas where paint has separated from the surface.
Don’t start painting until you understand what you’re seeing. A small cosmetic stain is different from a recurring water leak.
2. Clean the surface
Bathroom ceilings can accumulate dust, residue and other contaminants. Clean the surface according to the coating manufacturer’s recommendations and allow it to dry thoroughly. If mildew is present, use an appropriate cleaning method rather than simply painting over it.
3. Repair damaged areas
Scrape away loose paint and repair damaged drywall or surface imperfections as needed. Allow patching materials to dry according to their instructions before sanding.
4. Sand where necessary
Light sanding can help smooth repaired areas and remove rough edges around peeling paint. The objective isn’t to aggressively sand the entire ceiling. It is to produce a clean, sound, reasonably uniform surface.
5. Prime when appropriate
Apply primer to bare or repaired areas, stains or other surfaces that need sealing or improved adhesion. For stain blocking applications, use a primer specifically appropriate for that purpose and follow its application instructions.
6. Protect the room
Remove or cover fixtures and bathroom furnishings and protect flooring and surfaces from drips and splatter. Ceiling painting is messy even when the room is small.
How to Paint a Bathroom Ceiling
Once preparation is complete, the actual painting process is relatively straightforward.
1. Start with the edges
Use an appropriate brush to carefully cut in around walls, fixtures, vents and other areas that a roller cannot reach cleanly.
2. Roll the main ceiling
Use a roller suitable for the ceiling’s texture and the paint manufacturer’s recommendations. Work in manageable sections and maintain a wet edge where practical. Avoid repeatedly going back over areas as the paint begins to set.
3. Allow adequate drying time
Don’t rush the second coat. Paint may feel dry to the touch before it has fully cured. Temperature, humidity, ventilation, coating thickness and the specific product all affect drying and recoat times. Follow the manufacturer’s stated recoat time rather than relying on a fixed number of hours.
4. Apply the second coat when needed
Many ceiling repainting projects require two finish coats for consistent coverage, particularly when changing colors, covering repaired areas or working with a surface that does not achieve uniform coverage after the first coat.
Two coats should not be treated as an absolute rule. The product’s coverage instructions and the actual appearance of the first coat should guide the decision.
5. Inspect the finished ceiling
After the final coat has dried sufficiently, look at the ceiling from several angles and under normal bathroom lighting. Check for:
- Thin spots.
- Roller marks.
- Missed edges.
- Visible patches.
- Uneven sheen.
- Remaining stains.
It’s much easier to correct a problem immediately than after the bathroom has returned to normal use.
Planning a Painting Project?
Common Bathroom Ceiling Painting Mistakes
Some ceiling problems aren’t caused by bad paint. They’re caused by the way the project was approached.
1. Painting over peeling material
This usually leaves unstable material underneath the new coating. The new paint may fail along with the old paint.
2. Skipping cleaning
A dirty surface can interfere with adhesion. Bathrooms are not automatically clean simply because the ceiling is above eye level.
3. Ignoring water stains
A brown ceiling mark deserves investigation, especially if it keeps returning.
4. Painting over active mold or mildew
Covering visible growth does not address the moisture conditions that allowed it to develop.
5. Applying paint too thickly
More paint does not necessarily mean better protection. Excessively heavy application can affect drying and finish quality.
6. Recoating too soon
High bathroom humidity can make drying conditions slower. Follow the product’s recommended recoat time.
7. Using the wrong roller
Roller choice affects texture and coverage. A smooth ceiling generally calls for a different approach than a heavily textured surface.
8. Neglecting ventilation after painting
Freshly painted surfaces need appropriate drying conditions. Keep the room ventilated according to the paint manufacturer’s recommendations.
When Paint Is Not Enough to Fix a Bathroom Ceiling
This is one of the most important parts of any bathroom ceiling project. Paint should not be used to hide an unresolved building problem. If the ceiling has active water damage, recurring stains, significant mold, bubbling drywall or persistent peeling, identify and correct the underlying cause before repainting.
1. Active water damage
A leak from plumbing, the roof, an upper floor or another source needs to be repaired first.
2. Recurring water stains
If a stain returns after repainting, the moisture source may still be present.
3. Significant mold growth
Extensive mold growth should not simply be sealed beneath paint. The moisture source and appropriate remediation need to be addressed.
4. Bubbling or soft drywall
If the drywall has been damaged by moisture, painting over it won’t restore the material.
5. Persistent peeling
If peeling returns despite proper surface preparation, investigate humidity, condensation, incompatible coatings, poor adhesion or another underlying cause.
This approach can save money. Repainting a damaged ceiling before fixing the source of the damage often means paying for the same work twice.
Planning a Painting Project?
When Professional Painting May Be Worth Considering
Painting a small bathroom ceiling can be a reasonable DIY project when the surface is sound and the preparation is straightforward.
Professional help becomes more useful when the ceiling requires extensive preparation or when the cause of the damage isn’t obvious. Consider professional assistance if you are dealing with:
- Extensive peeling.
- Difficult water stains.
- Significant ceiling repairs.
- High ceilings.
- Difficult access.
- Multiple layers of failed paint.
- Extensive surface imperfections.
- A ceiling that repeatedly fails after repainting.
A professional painter can also help determine whether the problem is primarily a coating issue or whether the ceiling needs repair before painting.
For homeowners who prefer to have the preparation, coating selection, and application handled as one project, Big League Painting can be considered when professional bathroom painting is needed.
The important point is that professional painting does not make an unresolved moisture problem disappear. A good project starts with identifying what is happening to the ceiling and choosing the appropriate repair and coating process.
Conclusion
The best paint for bathroom ceiling is usually a quality interior acrylic/latex coating appropriate for humid or moisture prone areas. The ideal finish depends on the ceiling’s condition and your priorities: flat or matte can provide a traditional, low sheen appearance, while eggshell or satin can offer greater washability.
But paint selection is only one part of the job. Proper cleaning, repairs, surface preparation, appropriate primer, adequate drying time and good bathroom ventilation all affect how well the finished ceiling performs.
Most importantly, don’t paint over an active leak, significant mold problem, damaged drywall or recurring moisture issue and expect the problem to disappear. Fix the cause first, then prepare and coat the ceiling properly.