
Can You Paint Treated Wood? What You Need to Know Before Painting
TL;DR
- Yes, treated wood can generally be painted, including pressure treated lumber.
- Moisture is a major consideration with new treated wood. Do not rely on a fixed number of days; the lumber needs to reach a suitable condition for the coating system.
- Wet or contaminated wood can cause adhesion problems, including peeling, blistering and premature coating failure.
- Cleaning and preparation are essential. Dirt, mildew, algae, loose fibers, old coatings and other surface contaminants can interfere with paint adhesion.
- Primer may be appropriate or required, depending on the wood, existing surface and paint system. The primer and finish coat should be compatible.
- Old treated wood can often be painted, but weathering, graying, deterioration and existing paint or stain can change the preparation process.
Can You Paint Treated Wood?
Yes. Pressure treated wood can generally be painted once the surface is properly prepared and the lumber is sufficiently dry.
The reason treated lumber needs more consideration than ordinary interior wood is the treatment process itself. Preservatives are introduced into the wood to improve its resistance to decay and insects. Depending on the treatment process and how the lumber was stored, newly treated boards can retain substantial moisture.
That moisture matters because paint needs a suitable surface to form a stable film. If the wood is too wet, the coating may not bond properly. As the wood continues to release moisture, movement within the substrate can contribute to coating problems.
This does not mean treated lumber is unsuitable for paint. It means painting treated wood is a preparation job first and a painting job second.
The same principle applies to pressure treated deck boards, fence boards, posts, trim and other exterior components. The preparation should be adjusted to the condition of each surface rather than assuming every piece of treated lumber is ready at the same point.
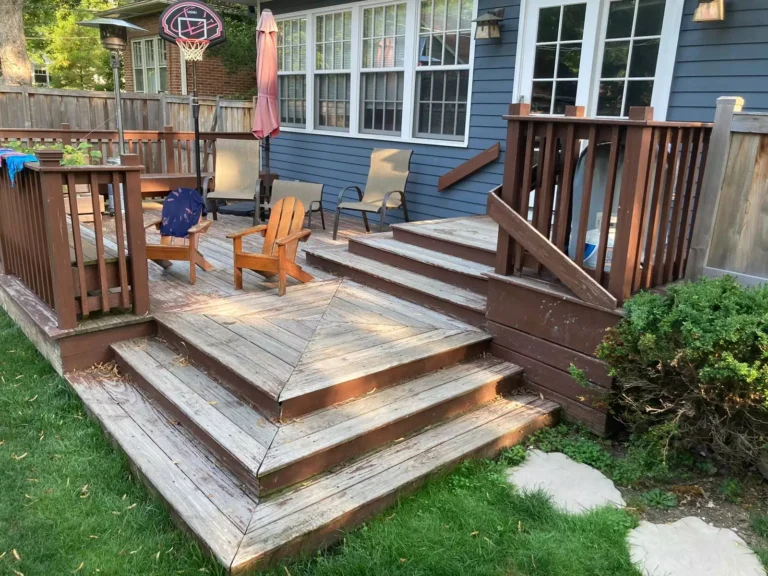
Why You Shouldn't Paint Wet Treated Wood
Painting wet treated lumber is one of the easiest ways to turn a straightforward exterior project into a premature coating failure.
Paint does not simply sit on the surface. A properly applied coating needs to adhere to the substrate and then dry and cure under suitable conditions. Excess moisture in the wood can interfere with that process. Possible problems include:
- Poor adhesion.
- Peeling paint.
- Blistering.
- Flaking.
- Uneven drying.
- Premature failure of the paint film.
- Moisture related problems beneath the coating.
Wood also naturally moves as its moisture content changes. It expands and contracts as environmental conditions change. Exterior coatings need enough flexibility and adhesion to tolerate normal movement.
Painting before the lumber is ready can make that situation worse. A coating may initially look acceptable but begin failing after the wood continues to dry or experiences repeated changes in temperature and humidity.
How to Tell If Treated Wood Is Ready to Paint
There is no single drying period that applies to every piece of pressure treated lumber. Some boards may become suitable for coating sooner than others, depending on their treatment, thickness, exposure, weather, airflow and storage conditions. A few practical checks can help.
1. Look at the surface
New treated lumber may have a noticeably damp appearance. It can also feel different from dry, weathered wood. Appearance alone is not a reliable moisture test, though. A board can look reasonably dry while still containing moisture below the surface.
2. Consider how the lumber has been stored
Wood exposed to moving air and suitable drying conditions generally behaves differently from lumber kept tightly stacked or exposed to repeated rain. Boards that remain shaded, covered or poorly ventilated may take longer to reach a suitable moisture condition.
3. Use a moisture meter when appropriate
A moisture meter can provide useful information about the moisture condition of wood instead of relying entirely on appearance or touch. There is no universal moisture meter reading that automatically means every treated wood project is ready for every coating. Different coatings and wood conditions have different requirements.
If you’re using a specific primer or paint, follow the manufacturer’s requirements for substrate moisture and application conditions.
4. Don’t rely only on the “feels dry” test
The surface can feel dry while the wood still contains considerable moisture internally. For a coating project where adhesion and longevity matter, a more objective moisture check can be helpful.
The safest approach is to evaluate the actual wood condition and compare it with the requirements of the coating system you plan to use.
Planning a Painting Project?
How to Prepare Treated Wood for Painting
Proper preparation is what separates a coating that holds up from one that starts failing shortly after application. The exact steps vary depending on whether the wood is new, weathered, painted, stained or deteriorated, but the general process looks like this.
1. Inspect the wood
Start by looking for:
- Cracks.
- Splinters.
- Loose fibers.
- Rot or deterioration. Damaged boards.
- Loose fasteners.
- Existing paint failure.
- Staining.
- Mildew or algae.
- Dirt and other contamination.
Paint is not a substitute for repairing deteriorated wood. Severely damaged boards may need to be repaired or replaced before coating.
2. Allow the wood to reach a suitable moisture condition
New pressure treated lumber should not simply be painted because it has been sitting for an arbitrary number of days.
Allow the lumber to dry under appropriate conditions and check its condition before coating. Follow the requirements provided by the primer and paint manufacturers. Weather also matters. Recent rain, high humidity, limited airflow and shaded areas can slow drying.
3. Clean the surface
Dirt and surface residue can prevent primer and paint from making proper contact with the wood. Cleaning methods should be appropriate for the substrate and the type of contamination. The goal is to remove surface contaminants without unnecessarily damaging the wood.
If pressure washing is used, excessive pressure or poor technique can roughen the surface, raise wood fibers or cause other damage. The wood should then be allowed to dry appropriately before coating.
4. Address mildew, algae or organic growth
If the boards have mildew, algae or similar growth, it should be addressed before painting. Simply painting over organic growth does not solve the underlying surface problem. Use a cleaning approach and treatment appropriate for the substrate and follow product directions. The surface also needs adequate time to dry after cleaning.
5. Sand problem areas where appropriate
Treated wood does not automatically need aggressive sanding from end to end. Light sanding can be useful for rough fibers, raised grain, splintered areas, failed coating edges or other surface irregularities. The goal is to create a sound, reasonably smooth surface without unnecessarily removing material.
Previously painted wood may require more careful sanding where old paint is peeling or where the edges of existing coating need to be feathered.
6. Prime when the coating system calls for it
Primer can improve adhesion, help produce a more uniform surface, and provide the appropriate base for the finish coat. The right primer depends on the substrate, surface condition, existing coating and finish paint. Do not assume that any general purpose primer will work equally well on every treated wood surface.
7. Apply compatible exterior paint
Use an exterior coating intended for the conditions the wood will face. Application should follow the manufacturer’s requirements for temperature, humidity, surface condition, recoat time and other environmental factors.
8. Allow the coating to dry and cure properly
Drying and curing are not necessarily the same thing. A surface can feel dry while the coating continues to develop its final properties. Avoid subjecting freshly painted wood to unnecessary moisture, heavy use or other conditions that could interfere with the coating’s development.
Planning a Painting Project?
What Primer Should You Use on Treated Wood?
The right primer depends on the specific wood and coating system. Primer can serve several purposes. It can improve adhesion, provide a more consistent surface for the finish coat and help the overall coating system perform more predictably.
For treated wood, compatibility is particularly important. The primer needs to be appropriate for the substrate and compatible with the finish paint.
Existing coatings also change the equation. A previously painted surface may require preparation and a primer suited to the existing coating rather than the original wood alone.
If the lumber is new and properly prepared, the manufacturer’s instructions for the selected paint system should determine whether a separate primer is required.
What Type of Paint Is Best for Treated Wood?
There is no single paint that is automatically right for every treated wood project. For exterior treated wood, the coating should be intended for exterior exposure and compatible with the prepared substrate and primer, if one is used. Important characteristics include:
- Good adhesion.
- Resistance to exterior weather exposure.
- Appropriate flexibility.
- Durability.
- Compatibility with the primer.
- Suitability for wood surfaces.
- Appropriate application requirements for the local conditions.
Exterior wood moves. Temperature, humidity, sunlight and moisture all affect the substrate over time. A coating needs to perform under those changing conditions rather than simply looking good immediately after application.
The specific product should be selected based on the application. A fence, vertical siding surface, deck component and sheltered wood post do not necessarily experience the same exposure or wear.
Always check the paint manufacturer’s instructions before application, especially for recommended primers, surface moisture, temperature, humidity and recoat conditions.
Can You Paint Old or Weathered Treated Wood?
Yes. Old or weathered treated wood can often be painted, and it may actually present a different preparation challenge than new treated lumber. Weathered boards may have:
- Dirt buildup.
- Gray, weathered fibers.
- Mildew or algae.
- Surface staining.
- Splintering.
- Cracks.
- Previous paint.
- Previous stain.
- Deteriorated areas.
Weathering does not automatically make the wood unsuitable for paint. The key question is whether the surface is still sound enough to support a coating.
Gray, degraded surface fibers may need to be removed or reduced through appropriate cleaning and surface preparation. Loose or failing paint needs to be addressed before recoating. Areas with rot or serious deterioration need repair rather than simply another layer of paint.
Previously stained wood can require additional consideration because the existing stain may affect adhesion and the appearance of the new coating. The preparation method depends on the type and condition of the existing finish.
The more complicated the existing surface becomes, the more important it is to identify what is actually on the wood before selecting the next coating.
Planning a Painting Project?
Can You Paint Treated Deck Boards?
Treated deck boards can be painted in some circumstances, but decks receive considerably more wear than many vertical wood surfaces. People walk on them, furniture moves across them, water collects in some areas and the boards experience repeated expansion and contraction.
Because of that exposure, the existing surface condition and the coating manufacturer’s instructions are especially important. Before painting treated deck boards, evaluate:
- Whether the lumber is sufficiently dry.
- Whether the boards are structurally sound.
- Whether old stain or paint is present.
- Whether the surface is contaminated.
- Whether mildew or algae is present.
- Whether the selected coating is specifically suitable for the intended deck application.
Painting a deck is not simply the same as painting a treated fence. The horizontal surface experiences different wear and moisture conditions.
Can You Paint Treated Fence Boards and Posts?
Yes, treated fence boards and posts can generally be painted once they are properly prepared and sufficiently dry.
Fence components are exposed directly to sun, rain, temperature changes and moisture. Fence boards may also have rough surfaces or irregularities from outdoor exposure. Cleaning is particularly important if the fence has accumulated dirt, mildew, algae or other contaminants. Posts may have different exposure conditions depending on their location and construction. Any section of wood that is deteriorating should be addressed before painting.
For a fence, consistency also matters visually. If some boards are heavily weathered while others are relatively new, they may require different preparation before the same finish is applied. Painting vs Staining Treated Wood Both paint and stain can be appropriate for treated wood, but they behave differently.
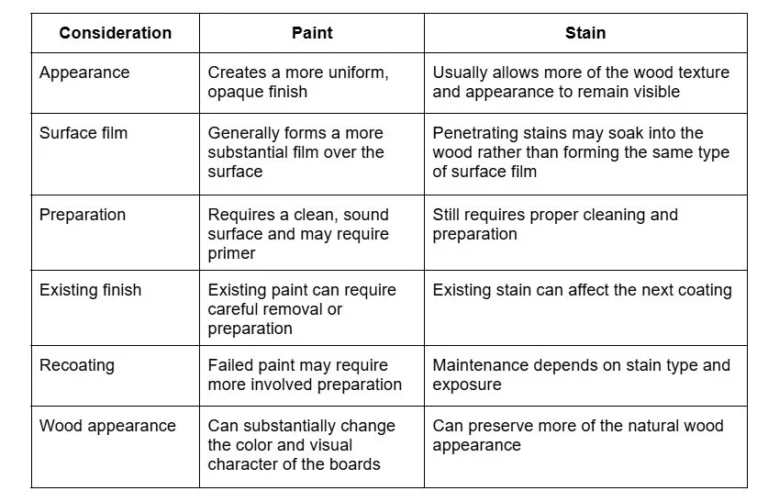
The better choice depends on the look you want, the existing finish, the type of wood surface, exposure and the coating manufacturer’s recommendations.
A painted surface generally gives you a more opaque appearance, while stain can be a better fit when retaining visible wood texture is a priority.
Common Mistakes When Painting Treated Wood
A few mistakes show up repeatedly in treated wood coating projects.
- Painting too soon: New lumber may still contain too much moisture for the selected coating.
- Relying on a fixed drying period: Weather and wood conditions vary, so a calendar alone does not prove the surface is ready.
- Skipping cleaning: Dirt, mildew, algae and residue can interfere with adhesion.
- Painting over failing paint: Loose or peeling coating needs to be addressed rather than buried under another coat.
- Ignoring old stain: Existing stain can affect preparation and the performance of a new paint system.
- Using an incompatible primer: Primer and finish paint need to work together as a coating system.
- Applying excessively heavy coats: Thick application can interfere with proper drying and may contribute to coating problems.
- Painting in unsuitable weather: Temperature, humidity, rain and other environmental conditions can affect application and curing.
- Ignoring wood deterioration: Paint cannot repair rotten or structurally compromised lumber.
- Skipping manufacturer instructions: Application requirements differ among products, so the coating manufacturer’s directions should take priority over generic rules.
How Weather Affects Exterior Treated Wood Painting
Exterior wood does not remain in a controlled environment. Sunlight heats the surface, rain introduces moisture, humidity affects drying and temperature changes cause the wood to move. That is particularly relevant in climates with humid summers, freezing winters and substantial seasonal changes.
A suitable painting day is not simply a day when the sky happens to be clear. The substrate and surrounding conditions need to meet the requirements of the coating being applied.
Rain shortly before painting can leave the wood too wet. High humidity can slow drying. Direct sunlight can heat a surface significantly and may affect application. Cooler temperatures can also slow drying and curing.
The paint manufacturer’s stated application conditions should therefore be treated as part of the preparation process, not as an afterthought.
How Often Does Painted Treated Wood Need Maintenance?
There is no universal repainting schedule for treated wood. Maintenance depends on exposure, coating quality and condition, wood movement, weather, surface preparation and how the particular area is used. Instead of repainting simply because a certain number of years has passed, inspect the surface periodically. Look for:
- Peeling.
- Cracking.
- Chalking.
- Blistering.
- Exposed wood.
- Fading.
- Failed caulking where applicable.
- Moisture related deterioration.
- Areas where the coating has worn away.
Addressing small problems while the surrounding coating remains sound can be easier than waiting until widespread failure occurs.
Planning a Painting Project?
When Should You Hire a Professional Painter?
Painting treated wood can be a manageable project when the surface is small, accessible and in good condition. Professional help becomes more useful when preparation is extensive or the consequences of coating failure are significant. Consider professional assistance for:
- Large exterior wood surfaces.
- Extensive fence or deck projects.
- Multiple structures or wood surfaces.
- Significant peeling or coating failure.
- Difficult to access areas.
- Extensive mildew or surface contamination.
- Wood that needs repair before painting.
- Projects involving multiple existing coatings.
- Situations where you are unsure whether the surface is ready for paint.
The biggest benefit is not simply applying the paint. Proper assessment, preparation and selection of a compatible coating system have a major effect on how the finished surface performs.
For homeowners who want help evaluating treated lumber, preparing exterior wood or completing a larger painting project, Big League Painting can be considered when professional painting assistance is appropriate.
Conclusion
Yes, treated wood can generally be painted. The important part is making sure the lumber is ready before the coating goes on. New pressure treated wood can retain significant moisture and painting it prematurely can lead to poor adhesion, peeling, blistering and other coating problems. A durable result starts with the condition of the wood:
- Inspect the lumber.
- Make sure it has reached a suitable moisture condition.
- Clean away dirt, mildew, algae and other contaminants.
- Repair or address damaged and deteriorated areas.
- Sand rough or failing areas where appropriate.
- Use a compatible primer when required.
- Apply an exterior paint appropriate for the surface and exposure.
- Follow the manufacturer’s requirements for application and curing.
For older treated wood, the process depends heavily on whether the boards are weathered, stained, painted, contaminated or deteriorated.
The key takeaway is simple: don’t rush treated wood into paint. Give the surface the preparation and drying conditions it needs, then use a compatible coating system. That approach gives the paint a much better chance of adhering properly and holding up through exterior weather.