
How Do I Clean a Paint Roller After Painting Walls?
To answer how do I clean a paint roller, first remove excess paint, then wash the roller cover with the correct cleaning agent. Use water and mild soap for most water based paints or the solvent specified on the label for conventional oil based paint. Clean the cover thoroughly, remove excess moisture and let it dry completely before storing it.
TL;DR
- Check the paint label first. Water based latex and acrylic paints generally clean up with water, while oil based paints require a compatible solvent.
- Remove as much excess paint as possible before washing. This reduces waste, mess and the amount of contaminated cleaning water or solvent.
- Clean the roller cover and frame separately. Paint can collect around the frame’s metal cage, end caps and handle connection.
- Let the cover dry completely before storage. Damp roller covers can develop odors and trapped moisture can affect how the cover performs later.
- Replace covers that are hardened, damaged or shedding fibers. A roller that cannot release paint evenly may leave a poor finish, even after cleaning.
What You Need Before Cleaning a Paint Roller
Gather your supplies before you start. Cleaning is easier when the paint is still wet and having everything ready prevents paint from drying while you look for a bucket or cleaner.
Supplies for water based paint
For most latex and water based acrylic wall paints, you will need:
- A paint tray or suitable surface for removing excess paint.
- A 5-gallon bucket or another suitable washing container.
- Warm water.
- A small amount of mild dish soap, if needed.
- A paint multi tool or flexible putty knife.
- Rubber gloves.
- Clean rags or paper towels.
- A well ventilated place to let the roller dry.
Additional supplies for oil based paint
If you used an oil based coating, gather the following:
- A compatible solvent, such as mineral spirits, if specified by the paint manufacturer.
- A solvent resistant container.
- Chemical resistant gloves suitable for the product.
- Eye protection.
- A clean, labeled container for collecting used solvent.
- A suitable location for solvent handling, away from ignition sources.
Read the paint label and the solvent’s safety instructions before starting. Some coatings have special cleanup requirements and waterborne alkyd paints may clean up differently from conventional oil based products.
Important: Never mix cleaning chemicals or substitute one solvent for another without checking compatibility. Keep solvents away from flames, sparks, children and pets. Provide the ventilation required by the product label.
How to Clean a Paint Roller After Painting
The following method covers the main steps for cleaning a reusable roller cover and its frame. The exact cleaning agent depends on the coating you used.
Step 1: Remove as much excess paint as possible
Start by removing the roller cover from the frame if it comes off easily. Hold the cover over the paint tray and use a paint multi tool or flexible putty knife to draw excess paint back toward the tray.
Work along the cover without crushing or cutting its fibers. The goal is to recover usable paint and reduce the amount that must be washed out.
You can also roll the cover over a piece of scrap cardboard or other suitable disposable material to transfer some of the remaining paint. Avoid pressing so hard that you flatten or damage the nap, which is the layer of fibers that holds and releases paint.
Why this step matters: A saturated roller can hold a surprising amount of paint. Removing the excess first makes cleanup faster and reduces the amount of paint entering your cleaning water or solvent.
Do not return paint contaminated with dirt, dried flakes or cleaning products to its original can.
Step 2: Identify the type of paint
Before wetting the cover, check the container to determine whether the paint is water based or solvent based.
- Latex and most water based acrylic paints: Usually clean with water, followed by a little mild soap if needed.
- Conventional oil based or alkyd paints: Generally require the solvent specified by the manufacturer, often mineral spirits.
- Waterborne alkyd paints: May clean up with soap and water, depending on the product.
- Specialty coatings: Epoxies, certain enamels, shellacs and other finishes may require specific cleaners or have a limited cleanup window.
Do not assume that every paint marketed as an enamel requires mineral spirits. Enamel describes a type of finish or coating, not one universal paint chemistry.
If the label says to use a particular cleaner, follow that instruction rather than relying on a general rule. Sherwin Williams and Benjamin Moore both provide cleanup guidance that distinguishes water based coatings from solvent based products.
Step 3: Wash a roller used with water based paint
For most latex and water based acrylic paints, follow this process:
- Hold the roller cover over a suitable container and work warm water through the fibers.
- Gently squeeze and rotate the cover to release paint trapped inside the nap. Avoid twisting it aggressively or pulling at the fibers.
- If paint remains, work a small amount of mild dish soap into the cover.
- Continue rinsing and gently squeezing until the water coming from the cover is clear and no visible paint remains.
- Check the center of the cover and its ends, where paint can remain trapped.
Change the water when it becomes heavily colored with paint. Repeatedly washing a cover in a bucket of saturated water simply moves paint around instead of removing it.
You may need several rounds of rinsing for a thick nap roller or a cover that was heavily loaded with paint. Smooth surface covers often release paint more readily, but the condition of the cover and the coating matter more than the roller’s size alone.
Use only as much soap as necessary. Excess detergent can be difficult to rinse out and may leave residue that affects the next application.
Should you use hot or cold water?
Warm water is a practical starting point for many water based paints. Follow the paint manufacturer’s instructions and avoid water so hot that it could damage the cover or burn your hands.
Do not rely on very hot water to remove paint that has already hardened. Dried paint may be firmly attached to the fibers and aggressive scrubbing can damage the cover without restoring its original performance.
Step 4: Clean the roller frame
A clean roller cover will not help much if dried paint remains on the frame. Paint can collect around the rotating cage, end caps, metal rod and handle connection. For a frame used with water based paint:
- Wash the metal cage and rod with water and a little mild soap.
- Rotate the cage while cleaning to expose areas hidden from view.
- Use a small cleaning brush to loosen paint around the ends and other hard to reach areas.
- Rinse away the loosened residue.
- Dry the frame with clean rag, then allow it to air dry before storage.
Check that the cage spins freely. Dried paint or debris can prevent smooth rotation, causing the roller to drag or leave uneven marks.
For a frame used with oil based paint, follow the coating manufacturer’s cleanup instructions. If solvent is required, use a compatible cleaner and avoid soaking plastic or rubber components unless the manufacturer confirms they can tolerate it.
Step 5: Remove excess water or cleaning solution
Once the cover is clean, remove as much excess moisture as practical. Gently shake the cover over the washing container or use a roller spinner if you have one and its instructions permit it. You can also press the cover lightly against a clean towel.
Do not wring the cover like a wet cloth. Twisting can deform the nap, loosen fibers or damage the adhesive that holds the cover together.
If you used a solvent, follow its instructions for draining and collecting the cleaning liquid. Do not treat solvent soaked material as if it were an ordinary wet towel.
Step 6: Dry the roller cover completely
Stand the clean roller cover on one end in a clean, ventilated area or use a suitable rack that allows air to circulate around it. Keep it away from dust, direct contamination and sources of excessive heat.
Let the cover dry naturally. The time required depends on the cover material, room conditions and how much moisture remains inside it.
Do not seal a damp roller inside a plastic bag for long term storage. Moisture trapped inside the cover can encourage odors and leave the roller in poor condition for its next use.
Once dry, inspect the nap. The fibers should feel clean and reasonably flexible rather than sticky, stiff or matted.
Planning a Painting Project?
How to Clean an Oil Based Paint Roller
Cleaning an oil based paint roller takes more care because water alone will not remove conventional oil based paint effectively.
1. Scrape off the excess paint
Remove as much wet paint as possible with a paint multi tool or putty knife. Work over the paint tray or a suitable collection container and avoid damaging the fibers.
2. Use the specified solvent
Check the coating label. If it calls for mineral spirits or another solvent, place a small amount in a suitable solvent resistant container.
Work the solvent through the cover according to the product instructions, gently releasing the paint from the fibers. Avoid unnecessary soaking or using more solvent than needed.
If the paint manufacturer permits cleaning with successive portions of fresh solvent, use that approach rather than allowing one heavily contaminated container to do all the work.
3. Collect the used solvent
Keep used solvent in a suitable, compatible, clearly labeled container. Do not pour it into a sink, toilet, storm drain or onto the ground. Some used solvents can be settled, separated, and reused according to the product and local waste management guidance. Do not assume this is appropriate for every cleaner or coating.
4. Complete cleanup according to the product instructions
Follow the manufacturer’s directions for any additional cleaning or rinsing. Some products permit a final soap and water wash, while others specify a different process. Do not automatically rinse a solvent treated roller under running water.
5. Dry the cover safely
Allow the roller to dry in a suitable, ventilated location, away from ignition sources and in accordance with the solvent’s safety instructions. Do not store it until the cleaning process is complete and the cover is dry.
For many DIY projects, cleaning an oil based roller may require enough solvent and disposal effort that replacing an inexpensive cover is more practical. However, a reusable cover may be worth cleaning when it is in good condition and the coating manufacturer’s instructions allow it.
What to Do With Paint and Cleaning Waste
Cleaning a roller creates waste that needs to be handled according to the type of paint and cleaning product involved.
For water based paint, avoid rinsing large quantities of paint into household plumbing. Remove as much paint as possible before washing, collect heavily contaminated water when practical and check local disposal guidance for the remaining waste. For oil based paint and solvent cleanup:
- Never pour paint thinner, mineral spirits or contaminated solvent down a drain or storm sewer.
- Keep used solvent in a suitable, labeled container.
- Follow local rules for solvent reuse, recycling and disposal.
- Take waste to an appropriate household hazardous waste collection program when required.
- Keep solvent contaminated rags away from heat and ignition sources and follow the product’s instructions for handling and disposal.
The U.S. Environmental Protection Agency advises against pouring household hazardous waste down drains or onto the ground. Illinois also provides specific guidance on paint and solvent disposal. Check the EPA’s household hazardous waste guidance and the Illinois EPA’s household waste disposal information before disposing of leftover cleaning materials.
Planning a Painting Project?
Common Paint Roller Cleaning Mistakes
A roller does not need to look brand new to be reusable, but paint residue and damaged fibers can affect the next coat. Avoid these common mistakes.
1. Waiting until the paint dries
Wet paint is much easier to remove than paint that has cured inside the fibers. Clean the cover as soon as practical after finishing, especially if you do not plan to use it again soon. If you are continuing the same painting project shortly, temporary storage may be more practical than washing the cover between coats. More on that below.
2. Using the wrong cleaning agent
Water will not adequately remove conventional oil-based paint, while an incompatible solvent can damage a roller cover or its components. Check the label instead of guessing. If you are unsure whether a product is waterborne or solvent based, consult its technical data sheet or contact the manufacturer.
3. Scrubbing too aggressively
Forceful brushing, scraping or twisting can flatten the nap and loosen fibers. Use gentle pressure and allow the correct cleaning agent to loosen the paint.
4. Leaving soap or paint residue behind
A cover can appear clean while still containing paint or detergent. Work through the fibers and rinse thoroughly. Remaining residue may affect paint release or introduce debris into the next coat.
5. Storing the cover while damp
Allow the roller to dry completely before long term storage. A closed bag can trap moisture and odors, so do not seal the cover until it is dry.
6. Ignoring the roller frame
Dried paint around the cage can restrict rotation. Clean the frame and check its movement before putting the roller away.
How to Troubleshoot a Roller That Still Looks Dirty
Some problems need more than another quick rinse. Use the condition of the cover to decide what to do next.
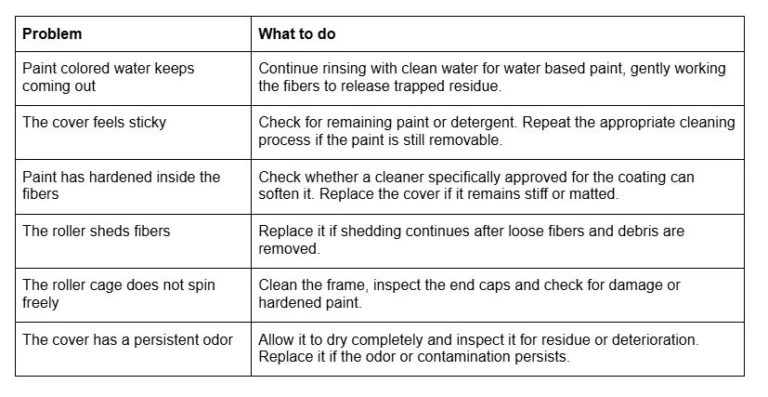
A purpose made roller cleaner may help with certain stubborn coatings, but read its label carefully. For example, Sherwin Williams sells a water based brush and roller cleaner intended for several types of paint and finish. That does not mean every cleaning product is compatible with every cover or coating.
If the cover has been left with hardened paint for a long time, repeated aggressive cleaning is rarely a good use of effort. A replacement is often the more reliable choice when the fibers no longer move freely.
Planning a Painting Project?
How to Dry and Store a Paint Roller for Reuse
Correct storage protects a clean cover from dust, moisture, and accidental damage.
For storage after the painting project
Once the cover is fully clean and dry:
- Inspect it for hardened paint, loose fibers and damage.
- Allow any remaining moisture to evaporate.
- Place the cover in a clean plastic bag or suitable storage sleeve.
- Store it in a dry location away from dust, excessive heat and direct sunlight.
Keep the roller cover separate from dirty tools and open paint containers. Dust or dried paint flakes can transfer to the fibers and create visible imperfections during the next application.
For a short break between coats
If you will resume painting soon with the same coating, you may not need to clean the roller immediately. Wrap the cover tightly in plastic wrap or place it in a suitable sealed bag to limit air exposure and slow drying.
For a brief break, this can be easier than washing and drying the cover before every coat. The safe holding period depends on the paint, temperature and manufacturer’s guidance, so do not assume a wrapped roller will remain usable indefinitely.
If you refrigerate a wrapped roller as some paint manufacturers recommend, keep it securely sealed and completely separate from food. Allow it to return to room temperature before use and follow the paint label’s instructions. Do not refrigerate solvent based products unless the manufacturer explicitly permits it.
Can You Reuse a Paint Roller or Should You Replace It?
You can reuse a paint roller cover if it is compatible with the coating, has been cleaned properly and remains in good condition. The frame can generally be reused for much longer when it is cleaned and maintained.
Cleaning is worthwhile when the cover still has a flexible nap, retains its shape and can release paint evenly. It may be more practical to replace the cover if:
- The fibers are matted or hardened.
- Paint residue cannot be removed.
- The cover sheds fibers into the paint.
- The material is torn, loose or separating from its core.
- The cover contains dirt or debris that could spoil the finish.
- Cleaning an inexpensive cover would require disproportionate solvent use and disposal effort.
For a smooth wall, a damaged or contaminated cover can leave lint, drag marks or uneven texture. For this reason, the cheapest cover is not always the most economical choice if it creates extra work or requires repainting.
For future projects, choosing the correct nap length and cover material for the surface and coating also helps. Big League Painting recommends treating tool preparation and cleanup as part of the painting process, rather than waiting until dried residue makes the next job harder.
Conclusion
The most reliable way to keep a paint roller usable is to remove excess paint promptly, use the correct cleaner, wash the cover without damaging its fibers and allow it to dry fully before storage.
For most water based wall paints, cleanup is straightforward with water and a little mild soap. Conventional oil based coatings require more care because they often need solvent based cleaning and special waste handling.
If a cover remains stiff, sheds fibers or cannot release paint evenly after cleaning, replace it rather than risking the finish on your next project. Big League Painting encourages homeowners to follow the coating manufacturer’s cleanup instructions, since the right method depends on the specific paint and roller material.